Contract Management
How to create a call of using Architectural Selection
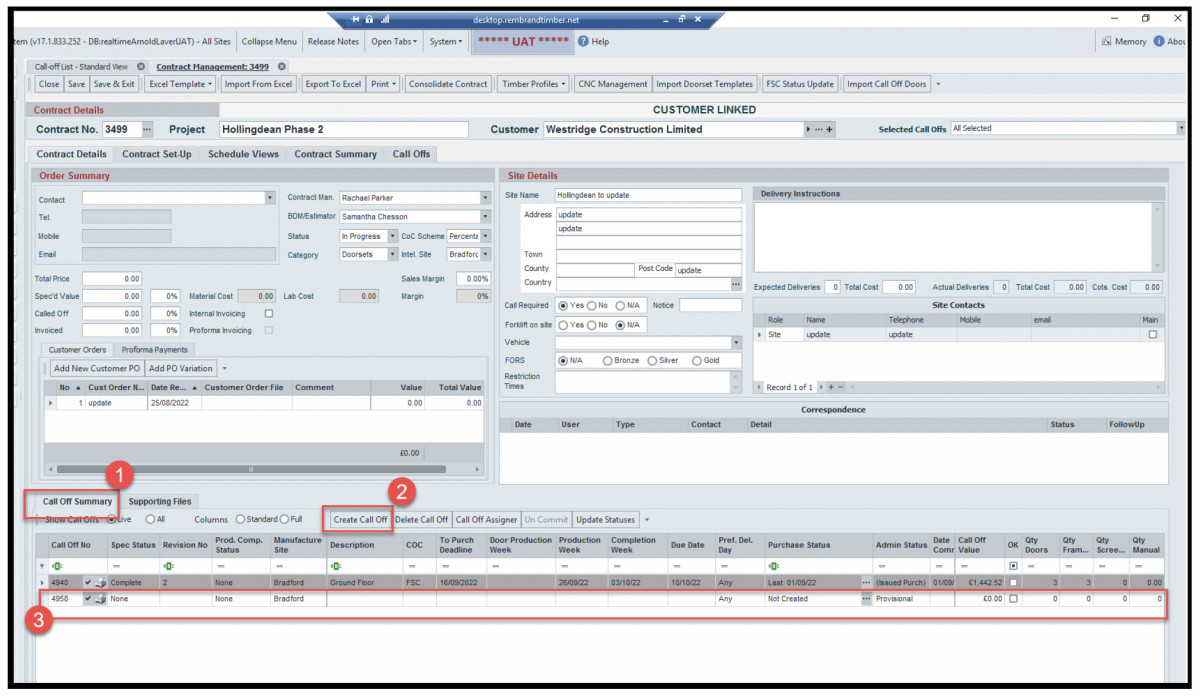
Open the contract the call off is to be created in
Select the correct CoC for the call off (this will be FSC/PEFC/Non certified) all except Grangemouth as no accreditation
Enter the lead times by selecting the correct date in the Production week column Individual site will have different lead times these will be agreed, and rules set up in Rtis to reflect these
If this calls off has a requested alternative delivery address complete this field refer to the full process steps in this link 46-How to Add an Alternative Address v1.1.docx
Save
Add the doorset/door/frame requirements
Door set Specification window now opens ready to input the specification required by customer – complete all relevant fields starting at the top
Doorset selector section here select either doorset or door/frame and enter the pricing details from the handover document
General Specification – complete all fields as per the handover document
- missing information from the handover document this will need to be obtained before proceeding
- For technical information refer to the technical standards are on Mondays.com board by following this this link https://national-timber-group.Monday.com/boards/762495528
- For additional technical support contact joanne.hardy@inteldoors.co.uk or david.hallam@inteldoors.co.uk
Doorset Notes This is where you can add your already set up notes into the doorset. This link is to the process document How to add a note to doorset spec v1.docx
Door leaves Specification – supply type is to be selected first
Product Range = Catalogue door from supplier i.e., Vicaima /Premdor
- Service option – are standard options that supplier offers
Select the … next to service options to make selections here
Bought in Bespoke = is a way to buy from a third party (only to be used in exception when Inteldoors cannot fulfil the requirements)
Frame Specification – In this section the intumescent strip information is displayed changes to colours are made here
Frame Comps and Arch Comps tabs – check correct entries pulled through amend any requirements as per the handover document – select the spy glass to view a sketch of the profiles see image 7
Ironmongery – here selection is made from the earlier set up of the ironmongery.
A reminder of how to set this up follow this link How to set up Ironmongery.docx
Additional ironmongery can be added by selecting the add iron item/add iron pack
A select add iron item
B select the … to add
By selecting the drawing, image you can view an image of the doorset which shows the hinge and vision panel positions
The Valid warning at the top of the doorset starts off as Red and it should turn to green upon completion of the doorset, if still red select the warning this will open a new window
This new window will detail what is causing the warning to still be red, these needs investigating and resolving before proceeding
- Check your entries
- Check the standards
- Request technical help
- Request help from the Rtis hep desk rtissupport@nationaltimber.co.uk link for how to use the help desk click here 5.How to – Get Rtis help-support-ask a question v1.docx
Once the valid/invalid warning is green, select the view material requirements tab this will go dark grey whilst Rtis checks all requirements, this can take a few minutes as the systems is checking the doorset.
When complete a new window opens any unspecified items will be highlighted in yellow, these need to be addressed before proceeding
- Check your entries
- Check the standards
- Request technical help
- Request help from the Rtis hep desk rtissupport@nationaltimber.co.uk link for how to use the help desk click here 5.How to – Get Rtis help-support-ask a question v1.docx
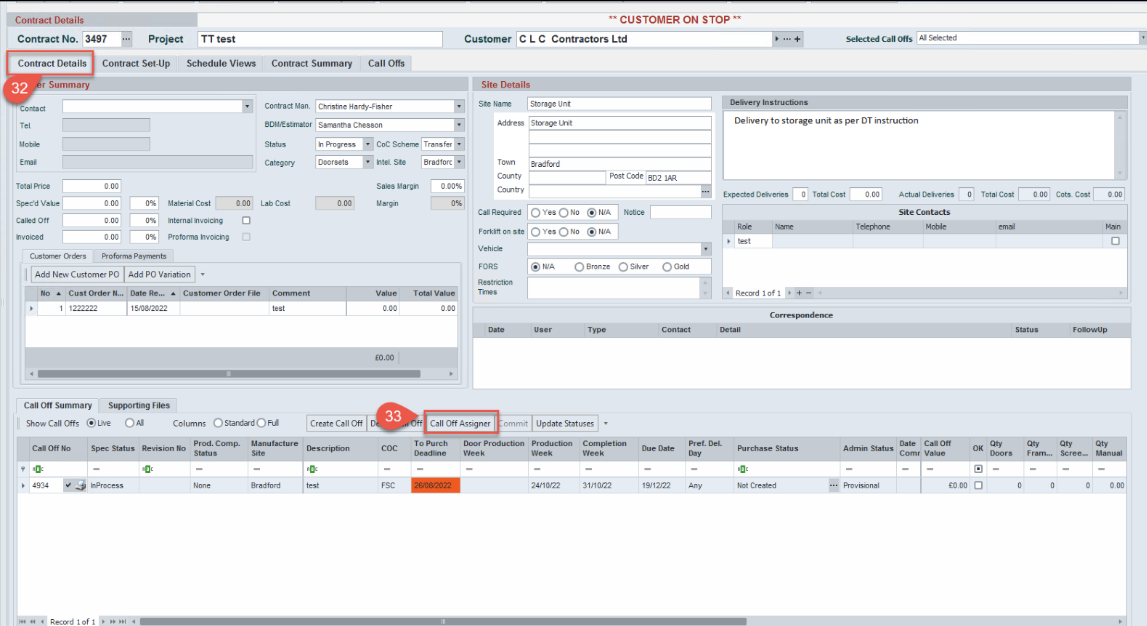
Assign to a call off
Items to be assigned will be highlighted in red in the tab check this is correct and select to assign to call off
How to produce schedule to send to the customer
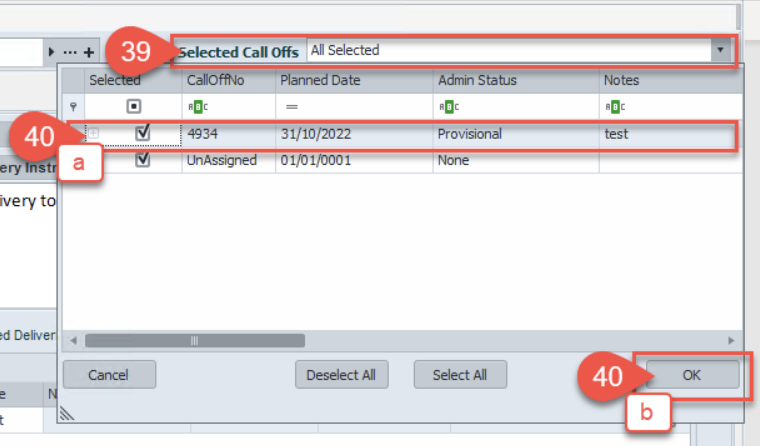
A. Ensure that you only Select the call off required for the customer (NOT unassigned)
B. Select ok
Window closes
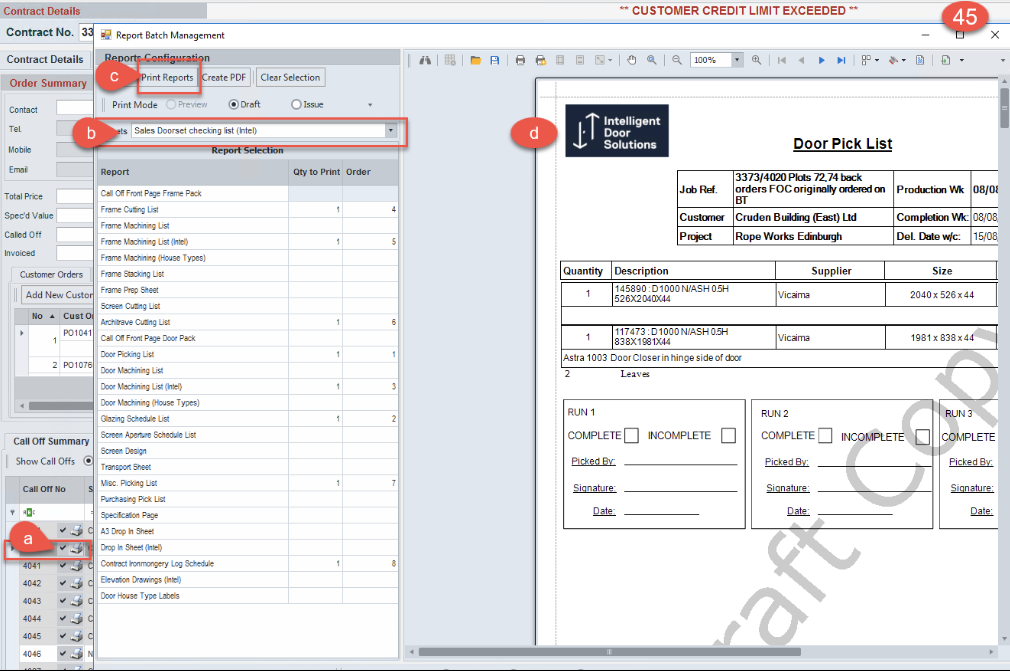
a. Check the selected call off is correct
b. Select print,
c. select the correct required schedule dependant on what is on the call off this will generate the schedule ready to send to customer
a. select load template
b. select create schedule
c. select Save as Excel this document and tidy up before sending to the customer for approval
Once the customer has confirmed the schedule is correct proceed to updating the purchasing status, reviewing the paperwork and committing the call off
From the call off line Select the … in the purchasing status, new window opens
a. click on the select all tab,
b. then select the regenerate selected tab,
c. message appears are you sure you want to recreate the purchase requirements click OK
d. message will appear update completed Select OK
From the call off line
- select the printer icon
- select Sales Doorset checking list (intel) from the pre-sets drop down
- select print reports
- paperwork PDF appears, view this here checking what you have entered is all appearing correctly
How to commit
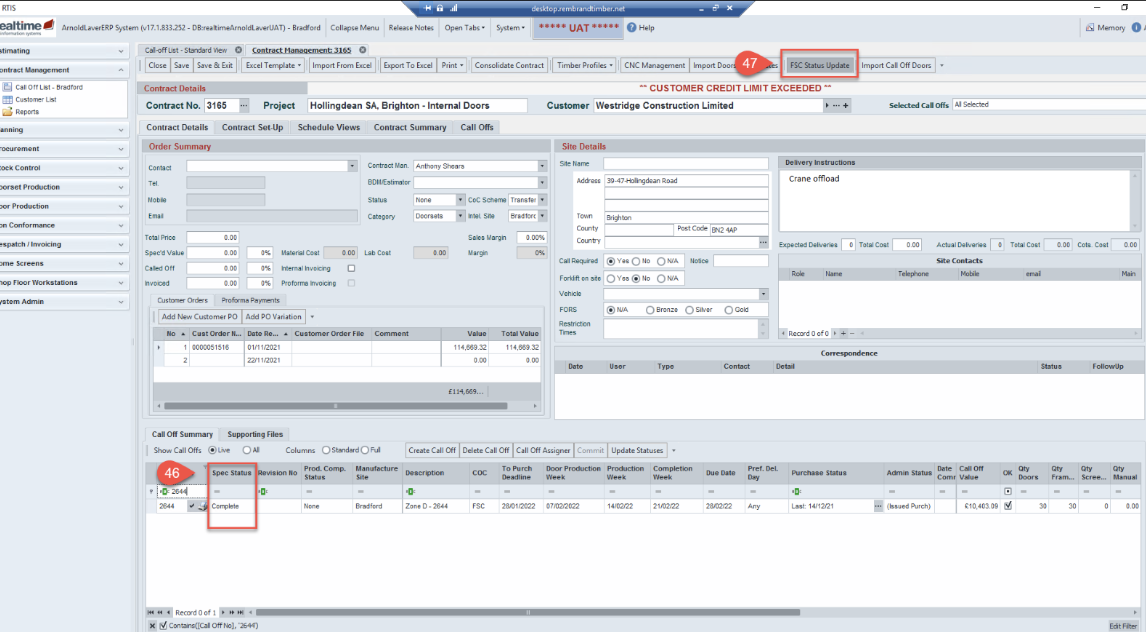
Ensure you have clicked in the correct call off, Change spec status to complete in the call off line
If the commit tab is NOT active hover over it and the reason it is not active shows these can be
- Customer over credit limit
- FSC
- Unspecified items if unspecified items follow the below to locate where in the call off these items are
a. Select schedule view
b. Ensure viewing the required call off
c. Select Select visible tab
d. Select Mat Reqs tab this now runs a check to locate where the unspecified items are
e. Pop up window confirms it has found errors these are highlighted in red
Open the doorset and correct the errors identified
Call off line is now a darker grey and no further changes can be made commit tab changes to being greyed out
Now release the paperwork for printing by clicking in the revision No column and release paperwork
Save
The production paperwork will be printed and given back to Scheduler for a final check before handing over to production for manufacture
