Non Conformance
How to Raise and complete a Nonconformance
Non-conformace’s are part of our Quality Management System ISO9001 and we as a company need to be aware of problems, we must document, determine, identify, and verify root causes and corrective actions—Identify all applicable causes that could explain why the problem occurred. All causes shall be verified or proved.
We can use 5 Whys and cause and effect diagrams to map causes against the effect or problem identified. Implement the corrective action and finally action the preventative action to prevent recurrence of a problem, By analysing and evaluating Non-conformances we can monitor and hopefully see impovements, which helps everyone in time and money and keeps customers happy.
Implement the corrective action and finally action the preventative action to prevent recurrence of a problem, By analysing and evaluating Non-conformances we can monitor and hopefully see impovements, which helps everyone in time and money and keeps customers happy.
Select add Non-conformance
(There is an option here to select add complaint this is not currently used by the business)
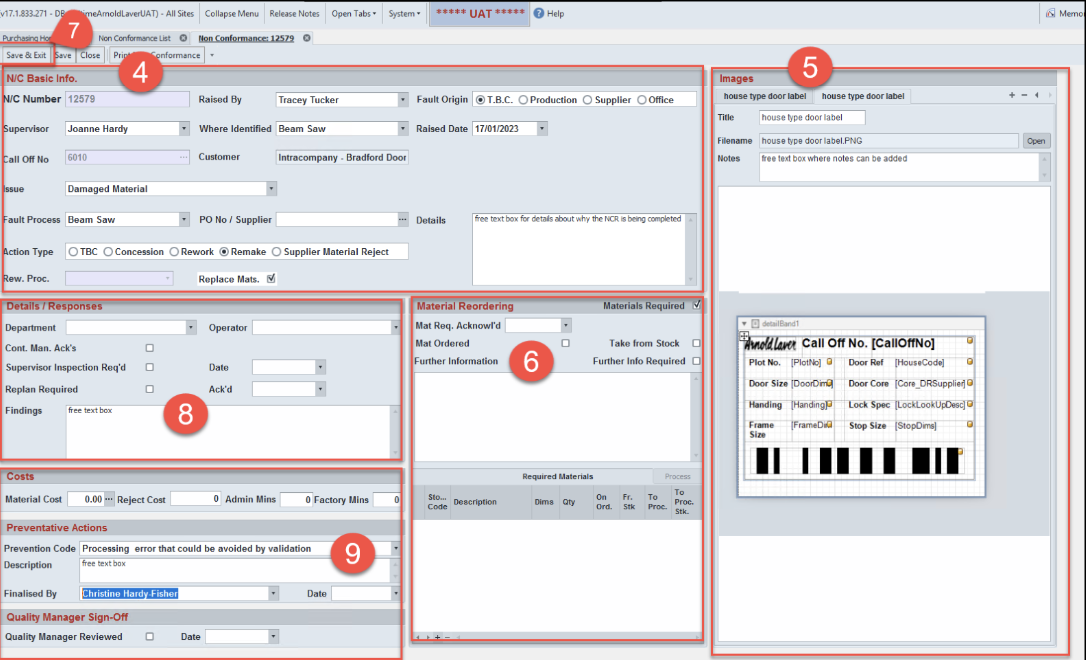
N/C Basic Info section
New window opens this is the non-conformance screen each field is to be completed
N/C Number – this will generate when the document is completed and saved
Raised by – select from the drop-down box the person who identified the nonconformance
Select Fault origin – if unsure select the T.B.C
Supervisors select the supervisor of the person who has raised the nonconformance
Where identified – select from the drop-down arrow where this was identified
Raised Date- select the date this NC was raised
Call Off No - Select the … next to the call off No field this will open a new search window Search for and select the call off related to this nonconformance this will pull through the call off number and the customers details
Issue Field – select from he drops down what the issue is
Fault Process – select from the drop down what the fault process is
PO No/ Supplier - this is for purchasing use ONLY
Details – this is a free text box type in here details of what has happened
Action Type – select what action is required, if unsure select TBC
Rew.Proc – not currently used
Replace Mats – this field will automatically be ticked if rework or remake is previously selected
Images
Add image here images can be added by selecting the + this will open the folders on the PC where images have previously been saved, select the image to be added
Title filed – will be populated by the name of the image uploaded
File name – this will also be auto populated
Notes - free text box for notes
Materials reordering section
If new materials are required select the box Materials required, purchasing will complete the rest of this section
Save and exit the NR number will now be generated
Details/Responses section to be completed by the supervisor
Department - select from the drop down
Operator – select from the drop down
Cont Man Acks - tick will appear in this box when the contract manager/scheduler for this Contract acknowledges the non-con on their home screen and communicates with the customer that we may have a problem and the delivery could be delayed. (This will stay on the home screen until the non con is finalised and signed off by the Quality Manager.
Supervisor Inspection Req’d
This will be ticked by purchasing if the material is on a longer delivery and the planner will replan and contact manager/scheduler to let the customer know.
Date – select date of the supervisor’s inspection
Replan – to be ticked if this requires replanning
Ack`d – to be acknowledged by planner that re planning has taken place
Findings
Determine, identify, and verify root causes —Identify all applicable causes that could explain why the problem occurred. Also identify why the problem was not noticed at the time it occurred. All causes shall be verified or proved, not determined by fuzzy brainstorming. One can use 5 Whys and cause and effect diagrams to map causes against the effect or problem identified.
Costs section
Material Cost - Purchasing department to complete.
Reject Cost -Purchasing department to complete.
Admin Mins - The amount of time to investigate this problem.
Factory Mins - The amount of time to remake or repair the problem.
Preventative Actions
Prevention Code - Select from dropdown box, please bear in mind that we need to provide evidence of the corrective action, for example if training this needs to be documented and available for inspection if requested.
Description free text box to be completed Define and implement the best corrective actions. Take preventive measures—Modify the management systems, operation systems, practices, and procedures to prevent recurrence of this and all similar problems. Action taken to avoid re-occurrence (Root cause to be analysed and evaluated)
Finalised By – Select from the drop down the person that is happy with the findings/root cause and preventative actions to stop the problem happening again.
Quality Manager sign off
Quality Manager Reviewed - Review will be ticked and dated once this document is completed, by the quality manager. If findings and preventative actions are not deemed as true. Any queries will be discussed with the team and management

