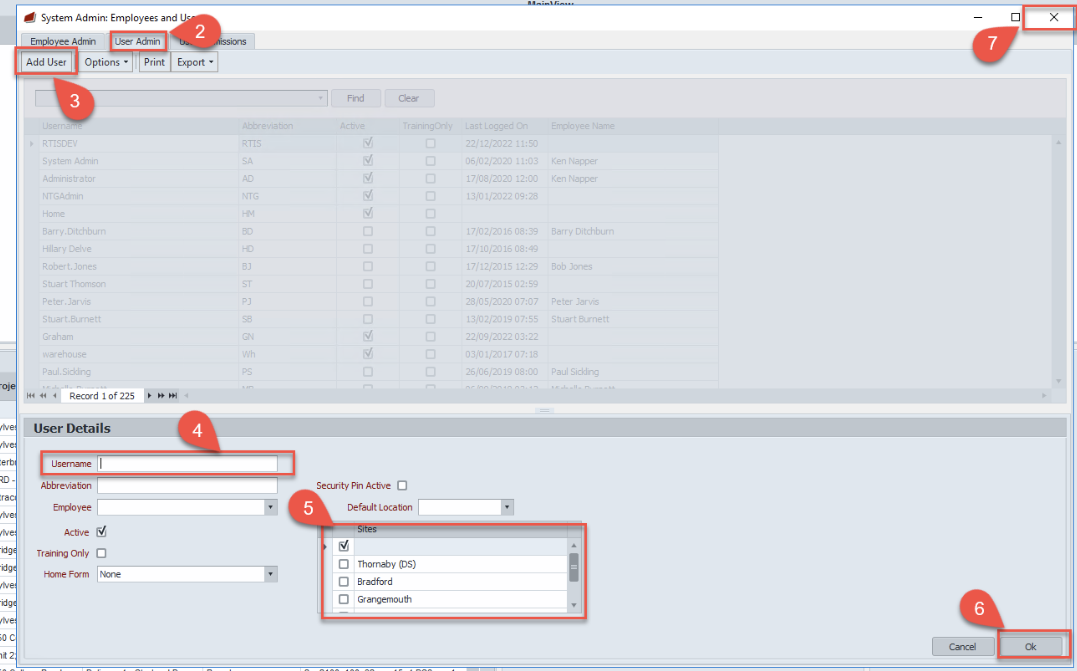
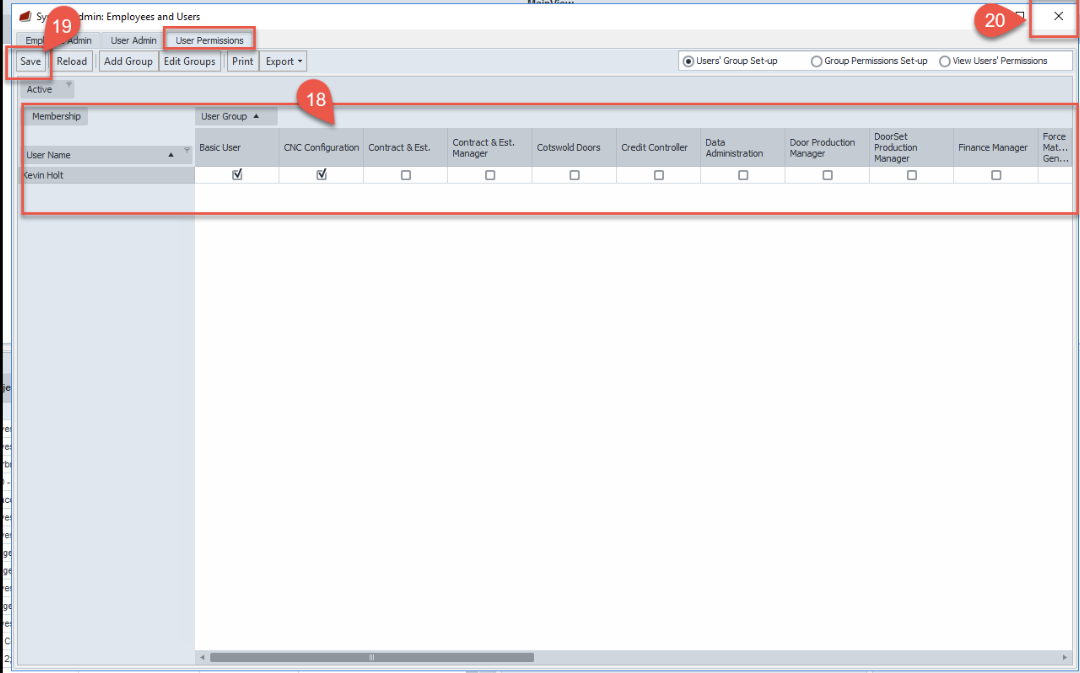
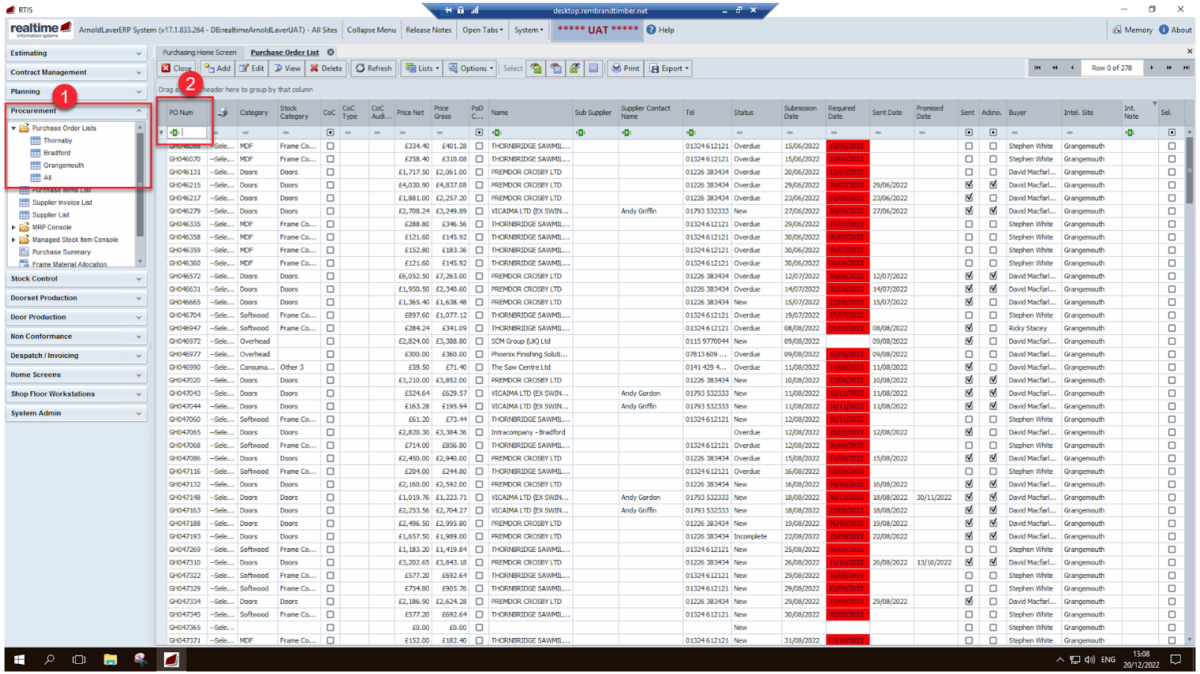
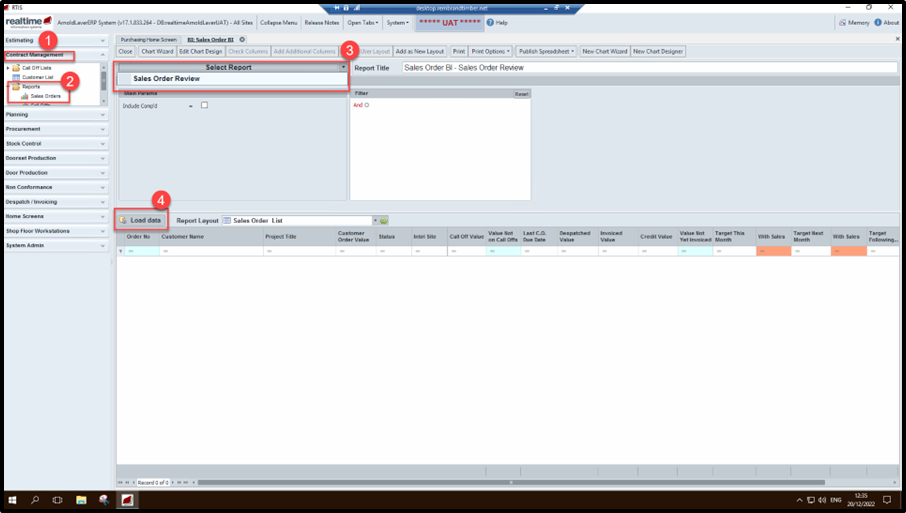
Welcome
Welcome to Realtime training. Depending on your role at Intelligent Door Solutions, you will have been allocated relevant sections to work through. These sections are planned to be worked through in order, so you won't be able to skip a section, you must read and confirm that you understand before moving to the next area.
Once you have completed all of your training you will receive an email confirming this.
Start now by watching this short video
How to access UAT
IT will provide you with UAT log in details once you have these follow the steps below to access UAT. UAT is where training is completed and is a copy of the live system.
IT contact number, if required, is 0114 276 4855.
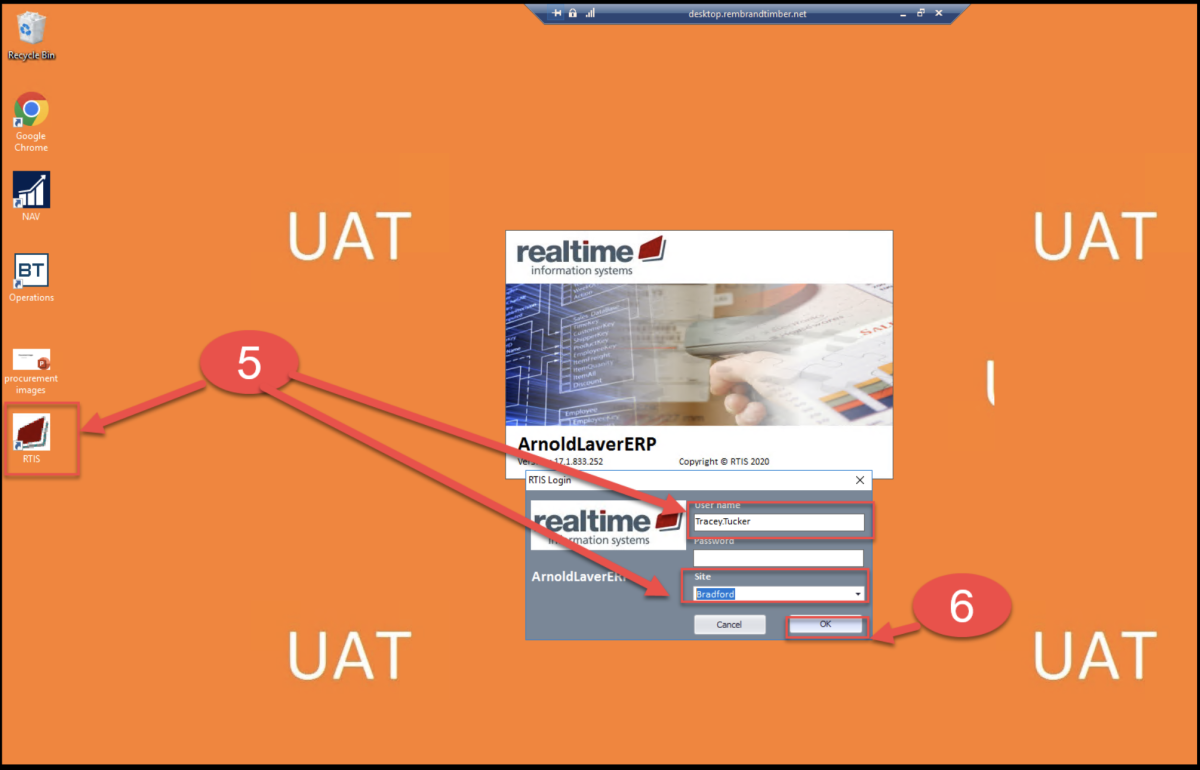
Select the RDP -UAT System icon from your desktop – if not on desktop call IT for assistance
Enter your password and select OK this will have been given to you prior to your first training session. If you cannot recall this or it has expired call IT and ask for support
UAT new window opens, this is bright orange, select the Rtis icon
New log in window opens, enter your username, IT will provide you with your password, select your site
Click OK
How to navigate around Realtime
Below will help with navigation around Rtis / Real time
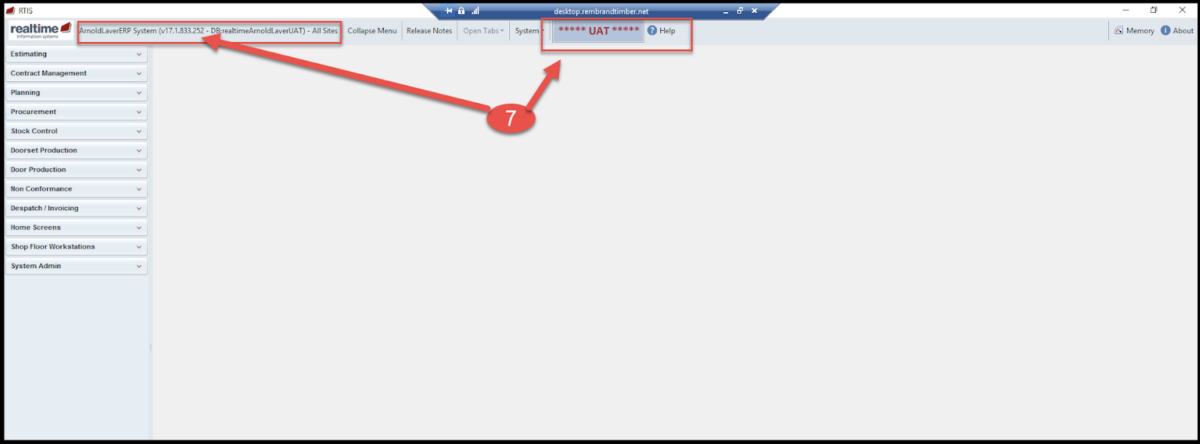
Version – it is very useful to know what version of Realtime you are using
Image 1 when first logging in
Image 2 always on show
When asked what version you have it is the last 3 digits that are important
Spy Glass – select the spy glass to see keys documents attached to the contact
- POD
- Despatch Note
- Customer Purchase order
- Customer Invoice
Refresh – this tab is available on many screens and key when working in one screen for a long period of time
How to Continue to Communication
This is a reminder that once Rtis/Realtime replaces Bistrack it is essential that verbal and other ways you communicated whilst using Bistrack that these CONTINUE
Rtis/Realtime is a new computer system to support Intelligent doors keeping all process and the journey of a customers order all in one place here is a link to the Welcome to Realtime v1.7
Rtis/Realtime does NOT replace communication that currently takes place unless instructed otherwise
Throughout the individual Process documents reminders are included about which departments may be affected by certain actions, below is an example of how valuable communication is to ensure a seamless process for the business ensuring the customer receives their order on time
Communication is key in our business – don’t forget to TALK and share information with teams that are affected by changes that are made
Example - Customer requests a date change – Depending on the status of the order the below departments all need to be communicated BEFORE changes are agreed and made.
Purchasing
Planning
Production
Despatch /Transport
Help and Support
email support@nationaltimbergroup.comWhen you have a question/request for support/ in need of help
In the subject field of the email state the function you are requesting help with and the call off no/invoice no/dispatch no/PO No your question relates to.
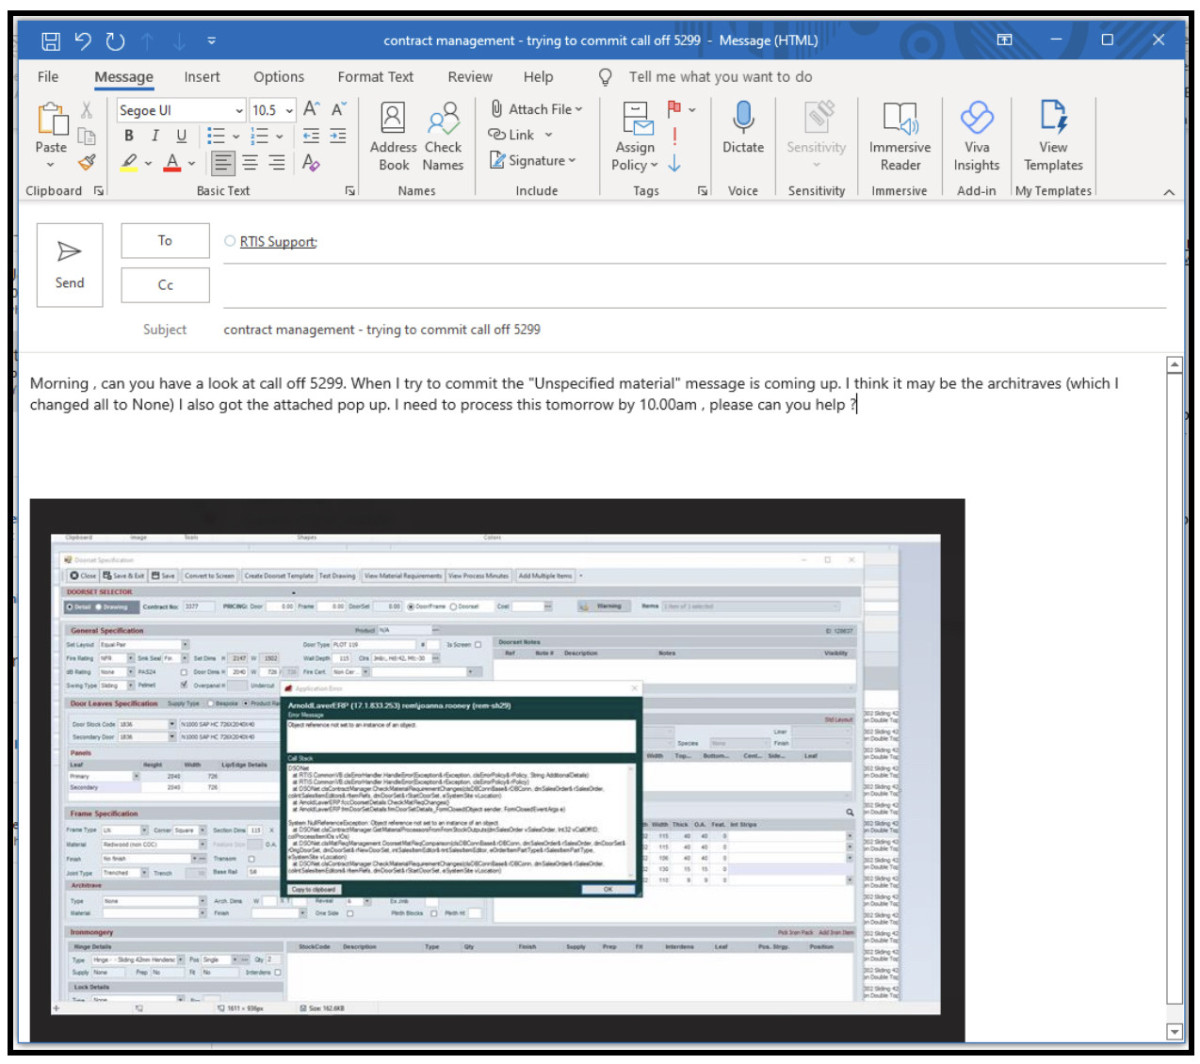
In the body of the email explain what help is needed, a screen shot would be useful.
State when you need to complete the task you are asking about, this will help prioritises the request.
Useful contacts
Here are a list of useful contacts.
Technical & Compliance Questions: - tec help desk on Mondays.com
Need a product code creating - contact purchasing or an onsite superuser by emailing purchasing@inteldoors.co.uk
Set up a new customer – forms are completed by BDM sent Credit control when approved link the account in Realtime
Set up a new supplier – form supplier agreement – contact purchasing@inteldoors.co.uk or via the help desk on Mondays .com
Customer over credit limit – Email credit control – Add here your credit controller email and telephone number
CC Name Telephone Number
Email address
Issues accessing remote desktop - IT Help Desk - 0114 276 4855 or email support@nationaltimbergroup.com
Access to Process steps/Training documents – any issue with accessing documents email rtissupport@nationaltimbergroup.com
Estimating
How to use the spreadsheet validation checker
How to Use the spread sheet Validation checker
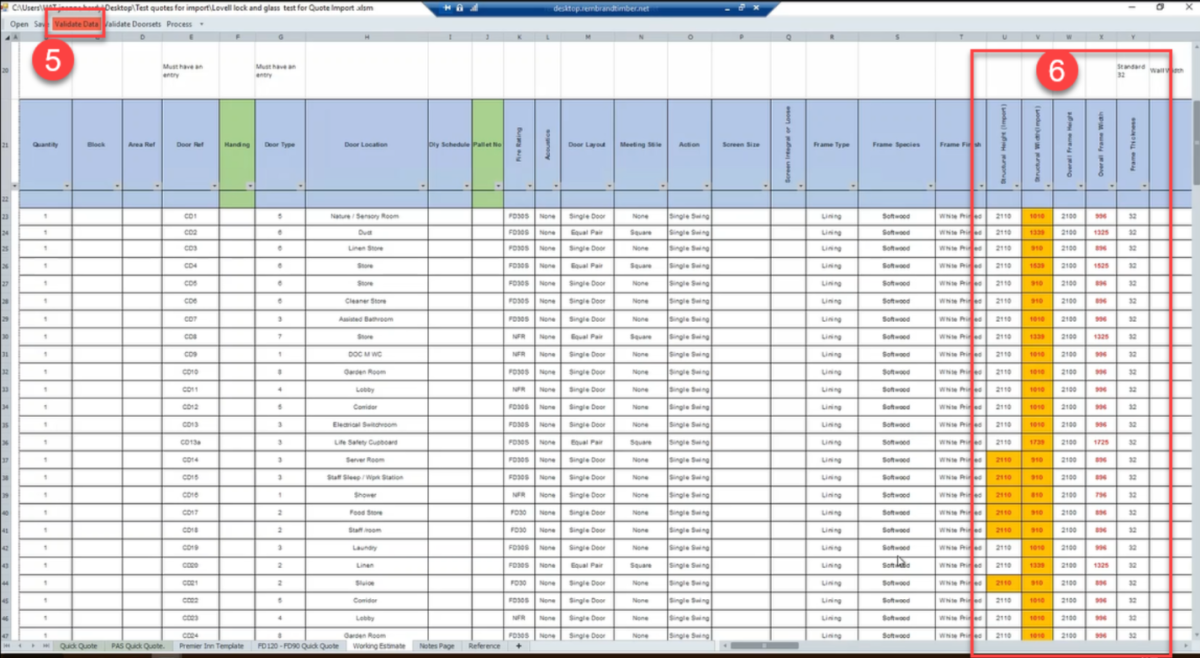
This is a great function within Rtis, here the customers spreadsheet with their specification on can be checked prior to being imported into the quote.
This opens new window start by selecting the Open tab this opens local files to locate the spreadsheet for validating;
Other tabs used in this process are as follows
Save –
Validate Date –
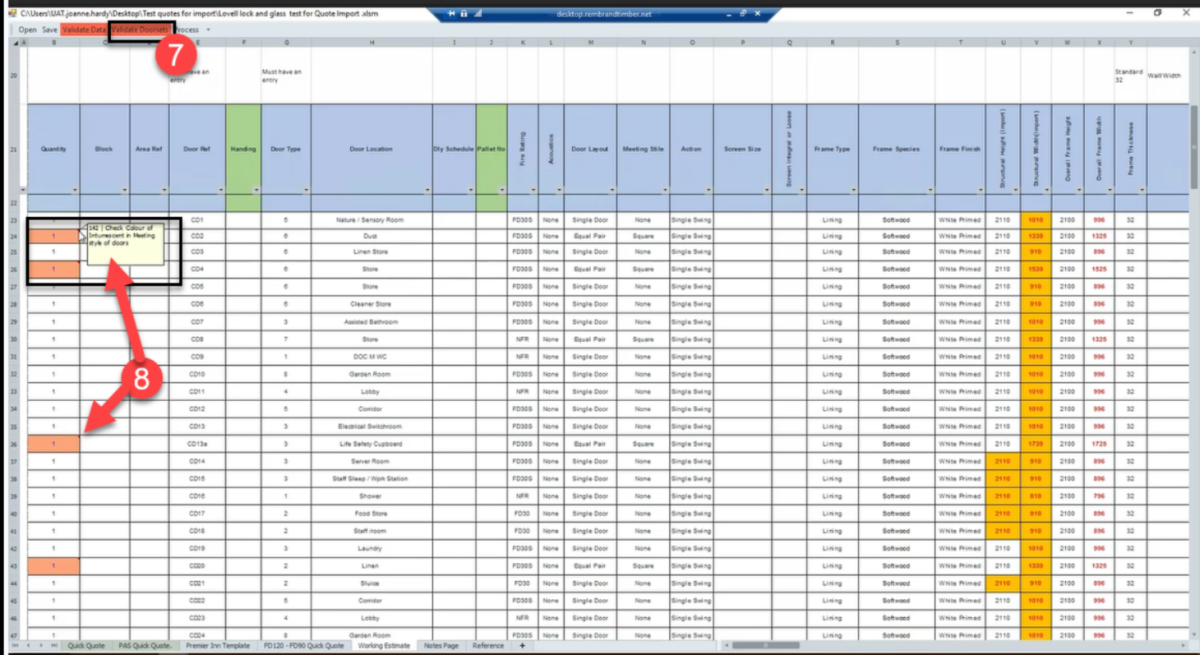
Validate Doorsets
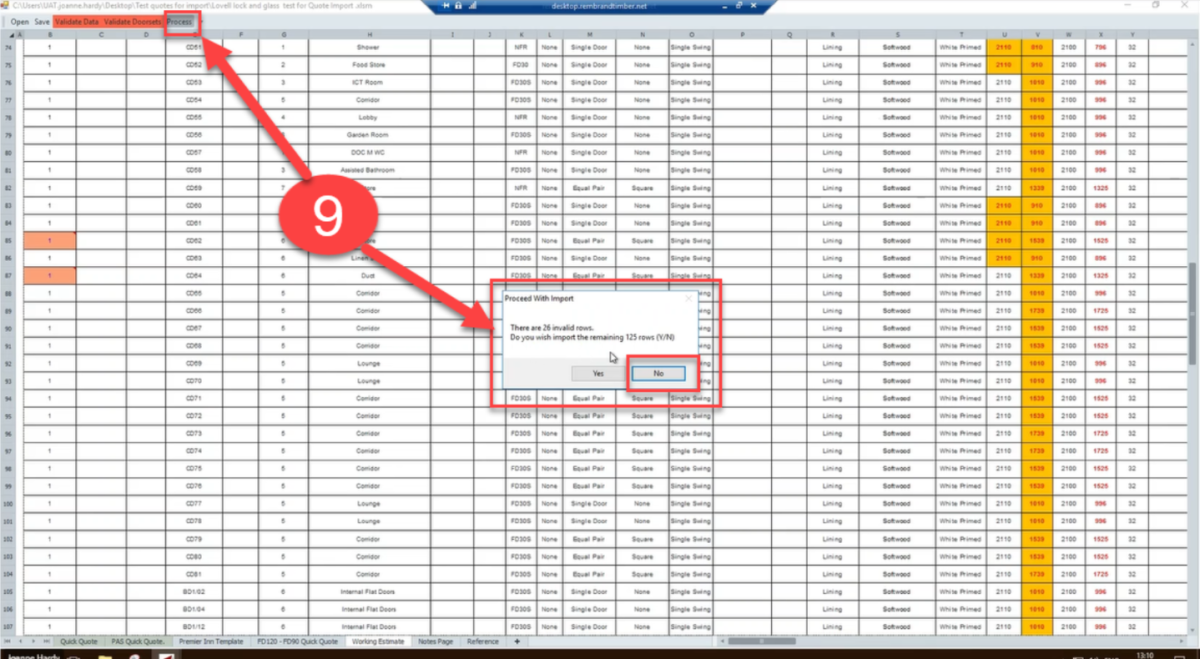
Process -
Example here shows the validate data tab has gone RED this means there are errors within the data that need to be corrected before proceeding.
Select the comments in the highlighted cell this will reveal the error and what needs to be checked continue to check the whole sheet for these comments and fix before proceeding.
How to use the Quote List
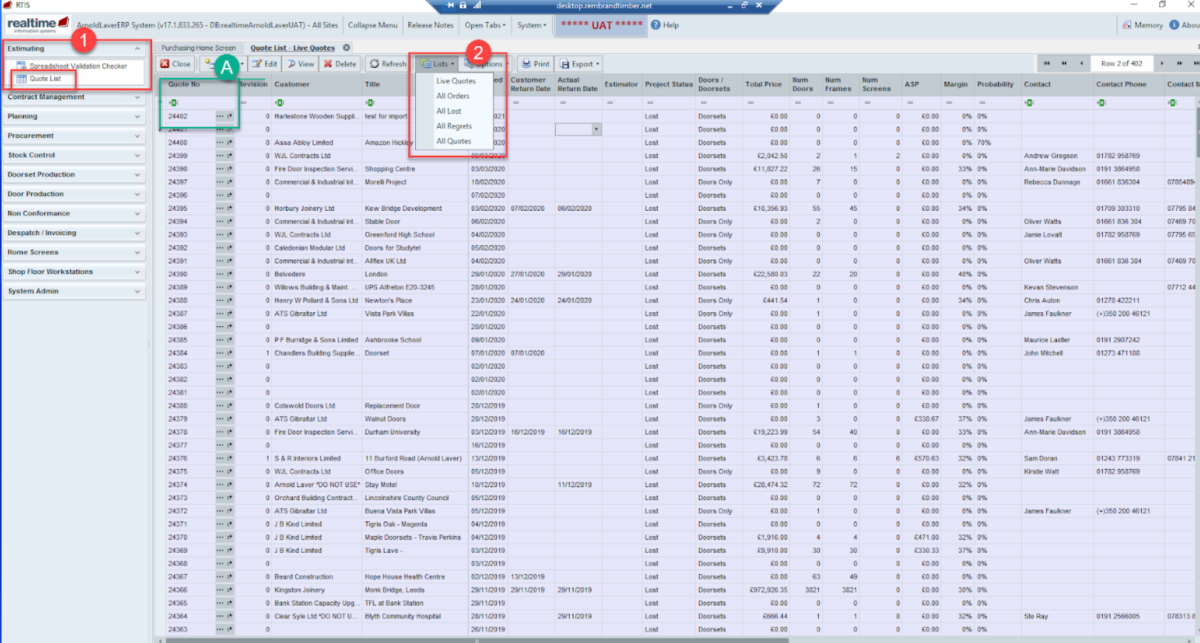
This view allows to be able to see the status of quotes by selecting lists tab the quotes can be sorted into
Live Quotes – all quotes still open
All Orders – means Quotes
All Lost – Shows all quotes with a status of lost
All Regrets – Business decision to abstain from quoting
All Quotes – Shows all regardless of status
Column details This information is pulled from the actual quote if information is missing this is due to the information not inputted
Quote No - Unique number given to quote as it is raised
Revision – version if the quote is revised
Customer – Customer name
Tittle - Name of quote/project
Received Date – Date quote request received
Customer Return Date – date customer requires the quote returned
Actual Return Date – Date actually returned to customer
Estimator – Name of estimator who created quote/quoted prices
Project status - Choices are - buying-Lost -Order- Secured- Tender
Door/Doorsets - Choices are – Door kits – Doors only – Doorsets- Frames only
Total Price - Value of quote
Num Doors – Actual number of doors
Num Frames – Actual number of frames
Num Scr – Actual number of screens
ASP – Average selling price
Margin – Margin percentage made on the quote
Probability – Choices are 0% - 30%- 50% - 70%- 90%
Follow up – Date when quote will be followed up
Contact – Person to contact
Contact Phone - Contact telephone number
Contact Mobile – Contacts mobile Number
Contact email – Contacts email address
Project scope – Comments added here by estimator
Quote Folder – Option to upload folders by selecting pick a folder -currently not used as all information in Mondays.com SharePoint
Intel Site – Shows site where the quote was raised
How to convert a quote to a contract
When a quote has been secured (won), it is then converted to and order the below steps are to be followed to complete this process.
Search for and open the quote which is to be converted to an order by selecting the estimating menu and select quote list.
How to raise a quote
Select the convert to order tab
New window opens which is the converted quote to a contract the contact has been given the next unique system generate contract number
Contract Management
How to link a customers account
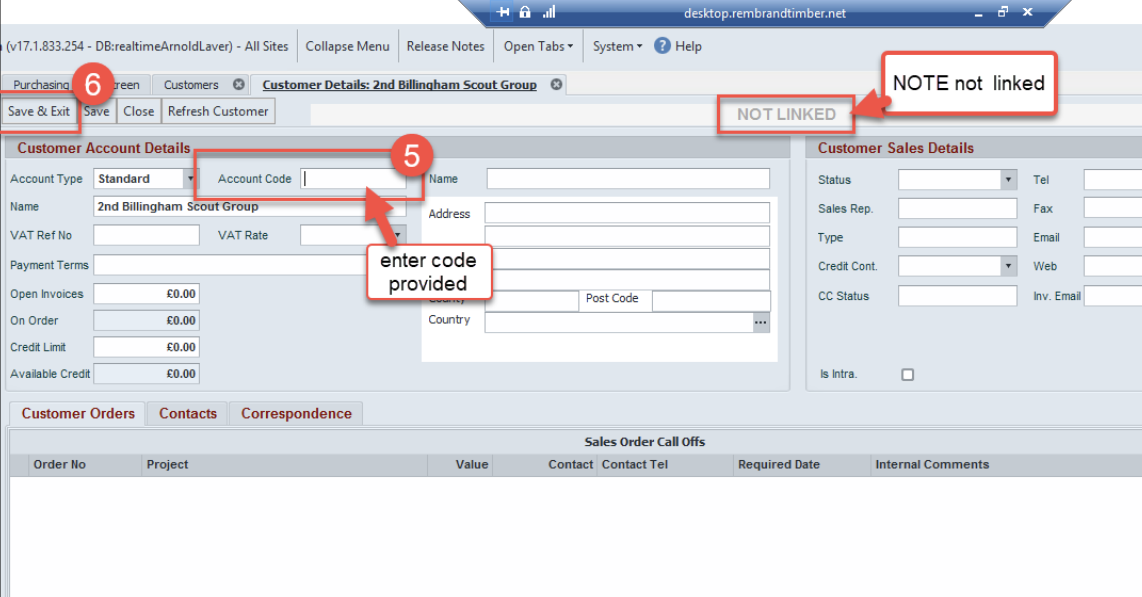
- When a new customer is set up accounts/credit control will email to say the account is now ready for use and is to be LINKED
- Follow the below steps to link the account, this will then allow contracts and calls off`s to be entered into Rtis
Take a note of the customer’s account number provided by accounts
Search in the account code field to see if the number has NOT already been used (if the account code has already been used report this by emailing rtissupport@nationaltimbergroup.com ) check step 3 before proceeding to step 4
Search for customer this is to ensure the account code as NOT got two entries
(If there are two entries for the customer report this by emailing rtissupport@nationaltimbergroup.com )
Allow ten minutes for this to activate this is due to a time delay between Rtis and NAV. – the refresh tab may need to be selected for the account to show as LINKED
How to convert a quote to a contract
When a quote has been secured (won), it is then converted to and order the below steps are to be followed to complete this process.
Search for and open the quote which is to be converted to an order by selecting the estimating menu and select quote list.
How to set up a new contract
When setting up a new contract ensure you have all the handover documents to hand and saved in the appropriate network area
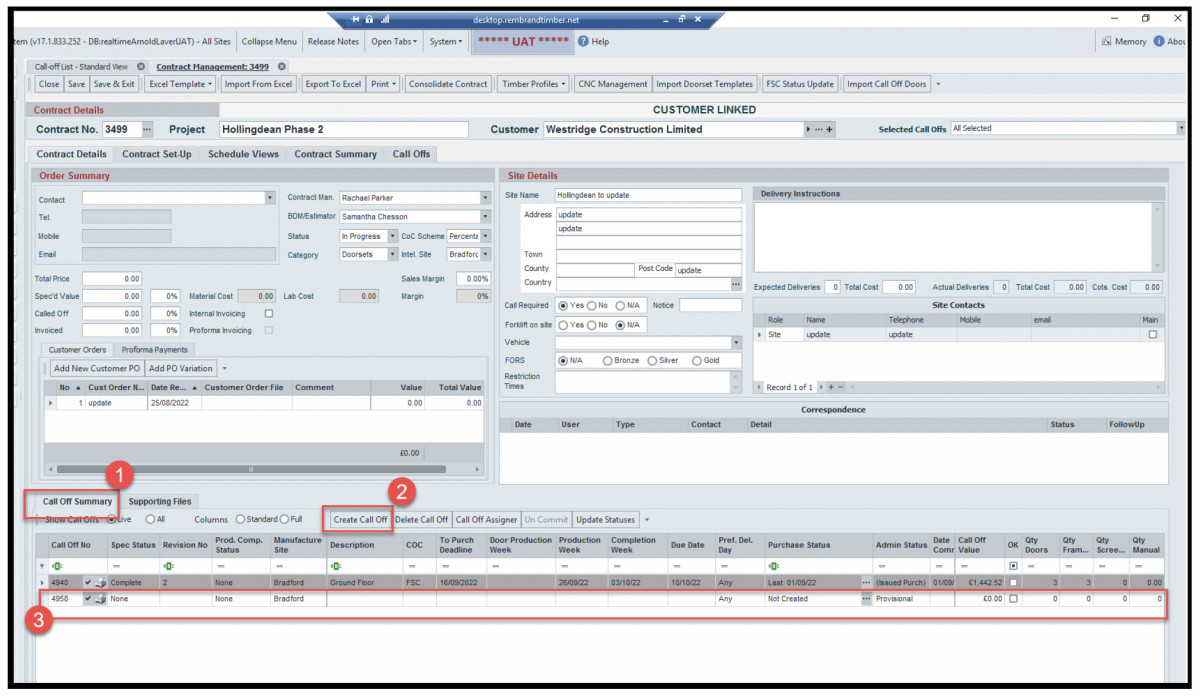
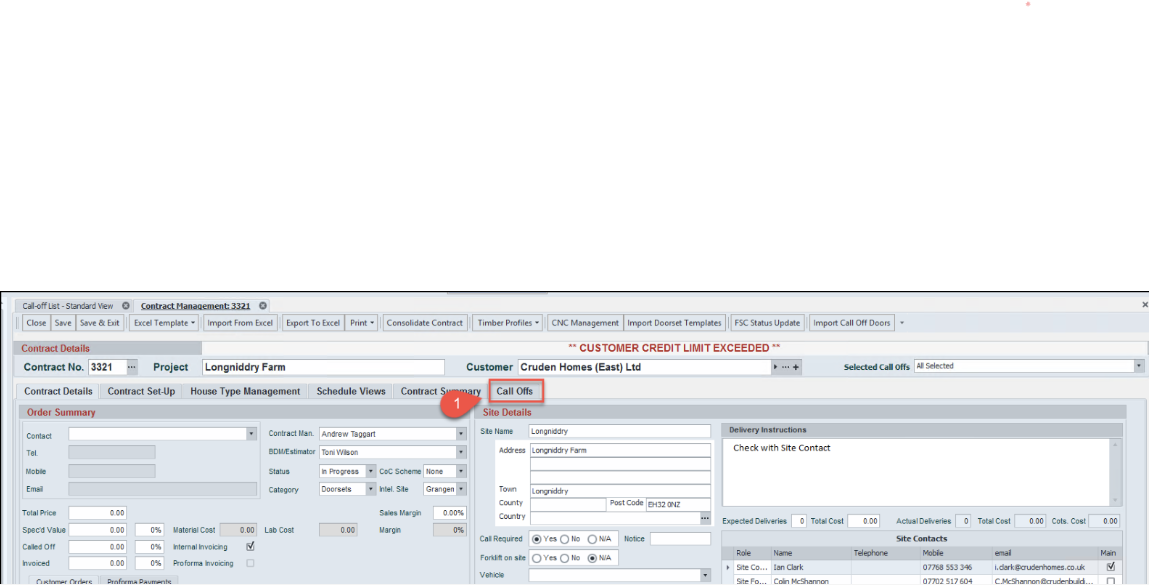
From the contract management menu select call off list- and select your site
If selecting ALL SITES– a new pop up will appear asking which site, do you want to create the new contract in see image 1 (A and B)
Select the drop-down arrow next to add and select the type of contract
- Architectural
- Housetype/plots
Complete these fields
- Contract man is the scheduler
- BDM/Estimator enter their name or the salesperson name
- CoC Scheme select the correct scheme
- Intel Site select your site ( this may be auto populated , it is best practice to check)
Select the Customer Orders tab – this is where the customers purchase order is added
- Cust order No enter the purchase order number
- Date received - this is the date Intelligent doors received the order
- Select the + which opens in the shared network area
- Search for the purchase order and attach
- Select the … and view the purchase order
- Add any relevant comments
- Enter the value of the purchase order
Site details – enter the site name and full address including postcode –
- Call required – select the correct option as per the handover document
- Forklift on site – select as per the handover document
- Vehicle – select from the drop down as per the handover document
- FORS – select as per the handover document
- Restriction time – enter these in the free text box as per the handover document
Site contact – complete adding all contracts on the handover document
- Select the + to add a contact
- Role
- Name
- Telephone number
- Mobile
- Email address
- Main – select this against who is the site main contact
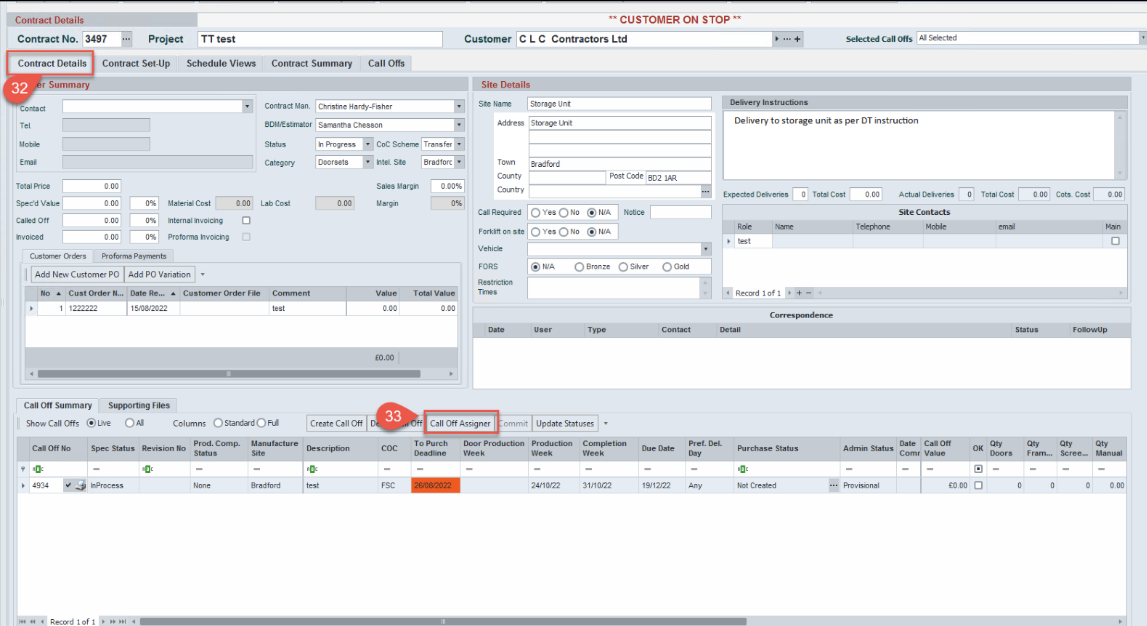
Customer on stop- this is a warning from credit control there are different levels of credit see image
To find out who the credit controller is follow these steps
- From contract management menu select customer list
- Search for customer
- View the credit controller in the credit controller column
The credit controller will need the following information
- Call off Number
- Copy of Purchase Order
- Value of Purchase order
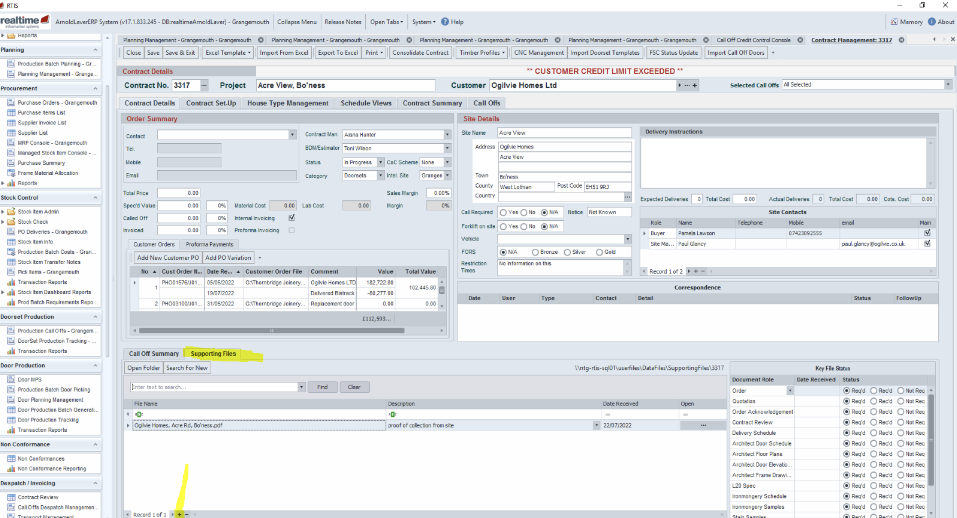
Supporting Files- here additional files can be added follow this link to the training documents 05.How To - Save and Add documents to the supporting files tab v1.docx
- Click on the supporting files tab
- This opens the view to see already added files
- Opens document
- Here is where you knew files
How to add a note to doorset spec
In Rtis/Realtime
Menu selected Contract Management ……………Topic from within Menu…Call off List….
Notes are added to communicate additional instruction to different departments, particularly special instructions for the production team as an example when using the below products, production will need a note adding. ** It is good practice to add all notes when first setting the contract up the same as is completed for ironmongery
- Heavy duty roller catches
- Flushbolts
- Sliding Doors
- Special Cuts
Search for Call off
New window opens
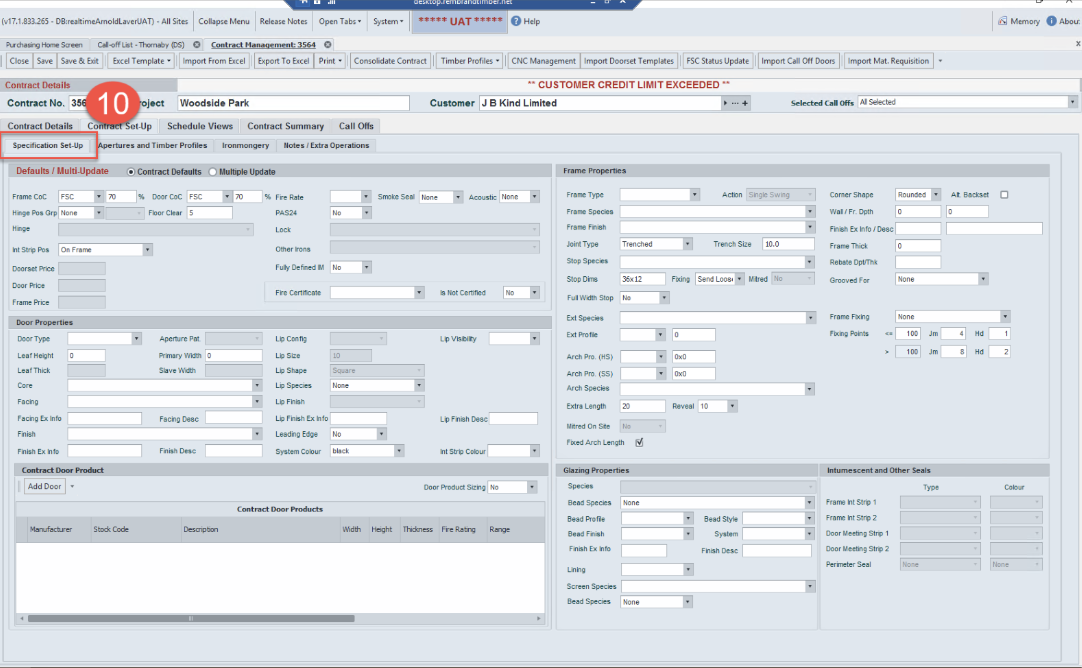
Select Contract set up tab
Select Notes and extra tab
Add a note
Contract note Number Field add a number 1
In the Description field enter topic here
Notes – add the exact detail request
Visibility select from drop down Who you want to see this
Save
Click back in description field, this generates a reference no
Back to House type Management
In doorsets notes field
Select +
Brings line up
Select from drop down note entered
Save
How to set up Ironmongery
Follow the below process steps to set up all ironmongery requirements for the contract
The handover document will detail all the ironmongery requirements
If unsure of standards, please refer to the Mondays.com board for information https://national-timber-group.monday.com/boards/762495528
Search in the search window, various ways to search, ideally the handover document will give the stock code
Work through the headings from left to right selecting what the customer has requested as per the handover document
Ensure the correct position is added for items that require this
- Positioning for a Lock – the standard position used is the centre line of the spindle
Save and exit
How to save and add documents to the supporting files tab
- Here are the steps of how to add documents to the supporting files tab within a contract
- Note *** it is essential that the documents attached to a contract are first saved in Sharepoint/Mondays.com otherwise no one else will be able to see the documents Lisa Dodds will confirm which documents are save in either SharePoint/Mondays lisa.dodds@inteldoors.co.uk
- Saving documents steps 1-2
- Attaching documents to the supporting files tab steps 3-10
Scan the paperwork to yourself
Save in Sharepoint/Mondays.com
Select call off list from the contract management menu
Search for call off
This expands the section, select the + from the bottom
This opens access to your folders
Search for your saved document which you have saved in either SharePoint or Mondays.com
Double click on the document you wish to attach
Add a description in the description field
- Example if attaching emails/customer comms – add brief description i.e.; “customer call off list “
- For production paperwork “ Production Paperwork “
How to create a call of using Architectural Selection
Open the contract the call off is to be created in
Select the correct CoC for the call off (this will be FSC/PEFC/Non certified) all except Grangemouth as no accreditation
Enter the lead times by selecting the correct date in the Production week column Individual site will have different lead times these will be agreed, and rules set up in Rtis to reflect these
If this calls off has a requested alternative delivery address complete this field refer to the full process steps in this link 46-How to Add an Alternative Address v1.1.docx
Save
Add the doorset/door/frame requirements
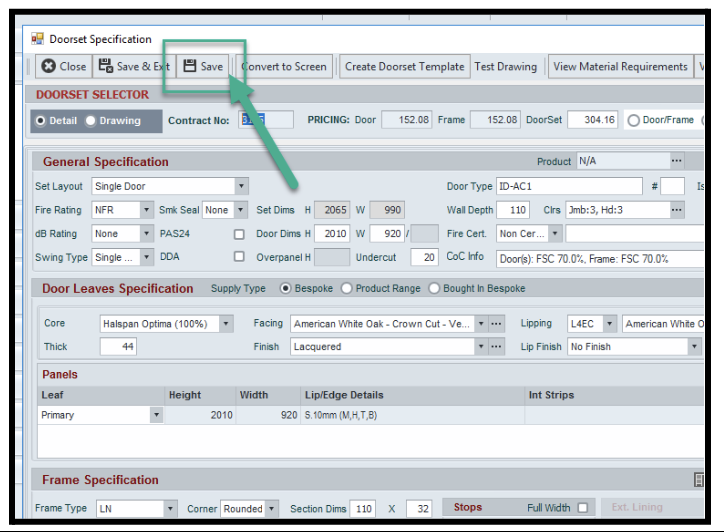
Door set Specification window now opens ready to input the specification required by customer – complete all relevant fields starting at the top
Doorset selector section here select either doorset or door/frame and enter the pricing details from the handover document
General Specification – complete all fields as per the handover document
- missing information from the handover document this will need to be obtained before proceeding
- For technical information refer to the technical standards are on Mondays.com board by following this this link https://national-timber-group.Monday.com/boards/762495528
- For additional technical support contact joanne.hardy@inteldoors.co.uk or david.hallam@inteldoors.co.uk
Doorset Notes This is where you can add your already set up notes into the doorset. This link is to the process document How to add a note to doorset spec v1.docx
Door leaves Specification – supply type is to be selected first
Product Range = Catalogue door from supplier i.e., Vicaima /Premdor
- Service option – are standard options that supplier offers
Select the … next to service options to make selections here
Bought in Bespoke = is a way to buy from a third party (only to be used in exception when Inteldoors cannot fulfil the requirements)
Frame Specification – In this section the intumescent strip information is displayed changes to colours are made here
Frame Comps and Arch Comps tabs – check correct entries pulled through amend any requirements as per the handover document – select the spy glass to view a sketch of the profiles see image 7
Ironmongery – here selection is made from the earlier set up of the ironmongery.
A reminder of how to set this up follow this link How to set up Ironmongery.docx
Additional ironmongery can be added by selecting the add iron item/add iron pack
A select add iron item
B select the … to add
By selecting the drawing, image you can view an image of the doorset which shows the hinge and vision panel positions
The Valid warning at the top of the doorset starts off as Red and it should turn to green upon completion of the doorset, if still red select the warning this will open a new window
This new window will detail what is causing the warning to still be red, these needs investigating and resolving before proceeding
- Check your entries
- Check the standards
- Request technical help
- Request help from the Rtis hep desk rtissupport@nationaltimber.co.uk link for how to use the help desk click here 5.How to – Get Rtis help-support-ask a question v1.docx
Once the valid/invalid warning is green, select the view material requirements tab this will go dark grey whilst Rtis checks all requirements, this can take a few minutes as the systems is checking the doorset.
When complete a new window opens any unspecified items will be highlighted in yellow, these need to be addressed before proceeding
- Check your entries
- Check the standards
- Request technical help
- Request help from the Rtis hep desk rtissupport@nationaltimber.co.uk link for how to use the help desk click here 5.How to – Get Rtis help-support-ask a question v1.docx
Assign to a call off
Items to be assigned will be highlighted in red in the tab check this is correct and select to assign to call off
How to produce schedule to send to the customer
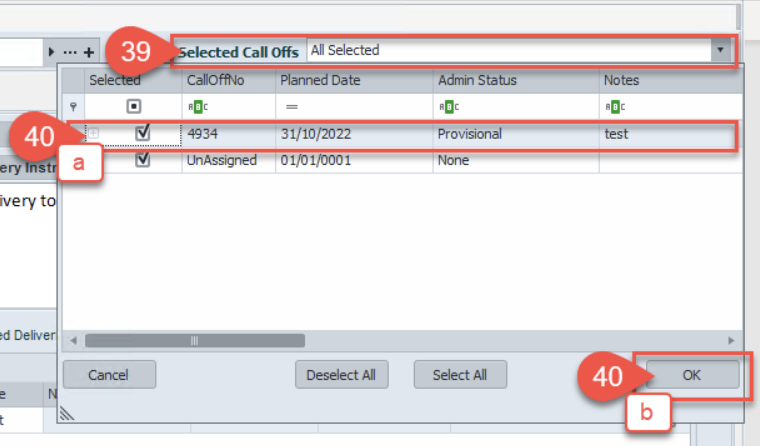
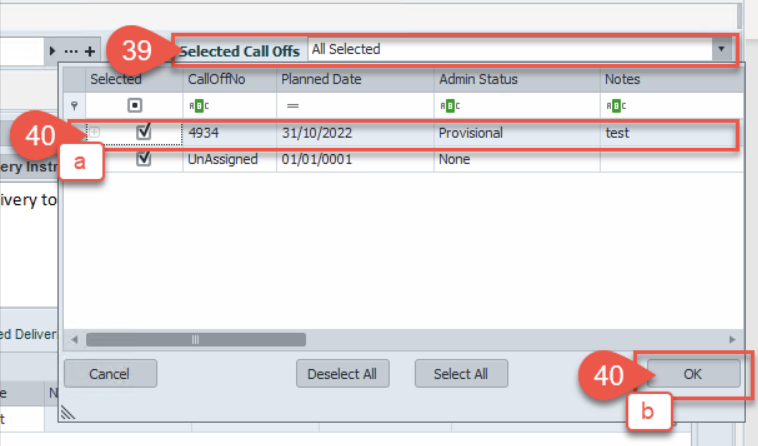
A. Ensure that you only Select the call off required for the customer (NOT unassigned)
B. Select ok
Window closes
a. Check the selected call off is correct
b. Select print,
c. select the correct required schedule dependant on what is on the call off this will generate the schedule ready to send to customer
a. select load template
b. select create schedule
c. select Save as Excel this document and tidy up before sending to the customer for approval
Once the customer has confirmed the schedule is correct proceed to updating the purchasing status, reviewing the paperwork and committing the call off
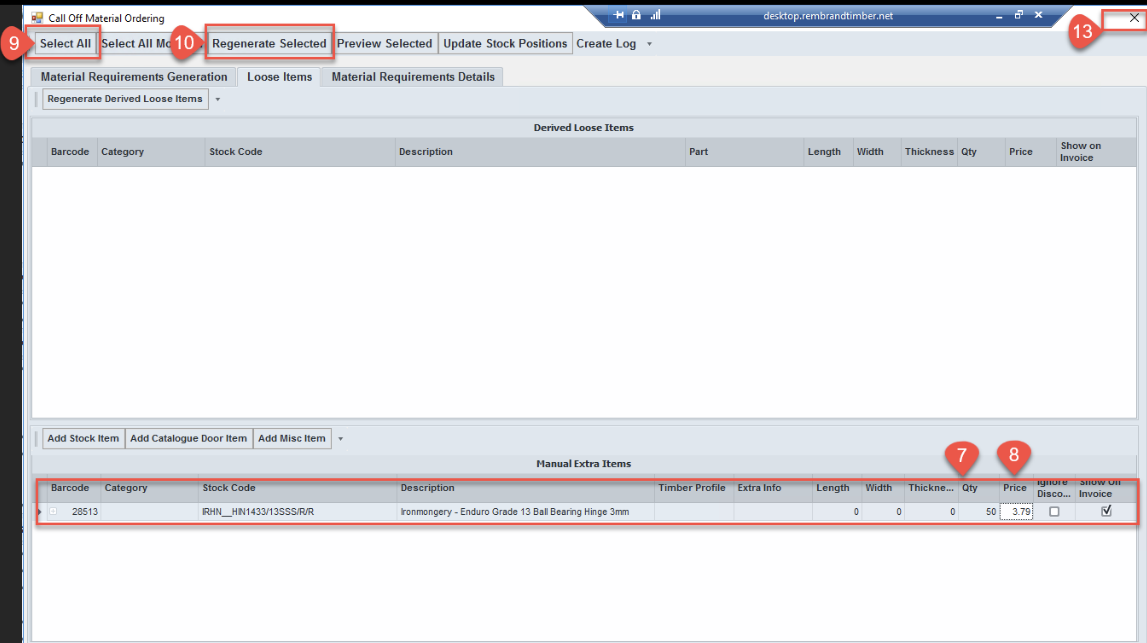
From the call off line Select the … in the purchasing status, new window opens
a. click on the select all tab,
b. then select the regenerate selected tab,
c. message appears are you sure you want to recreate the purchase requirements click OK
d. message will appear update completed Select OK
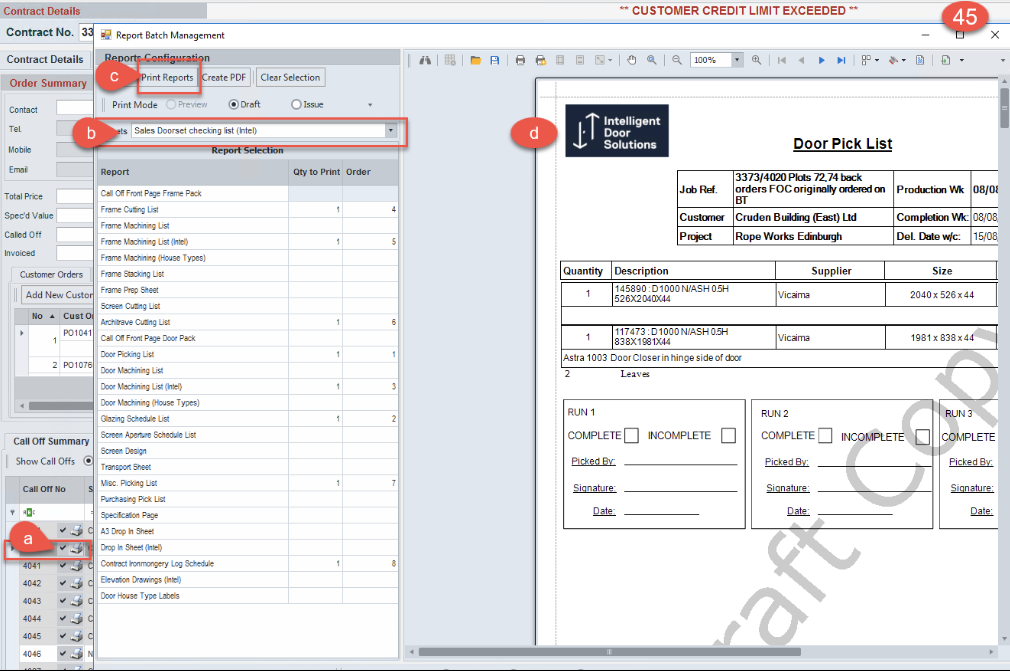
From the call off line
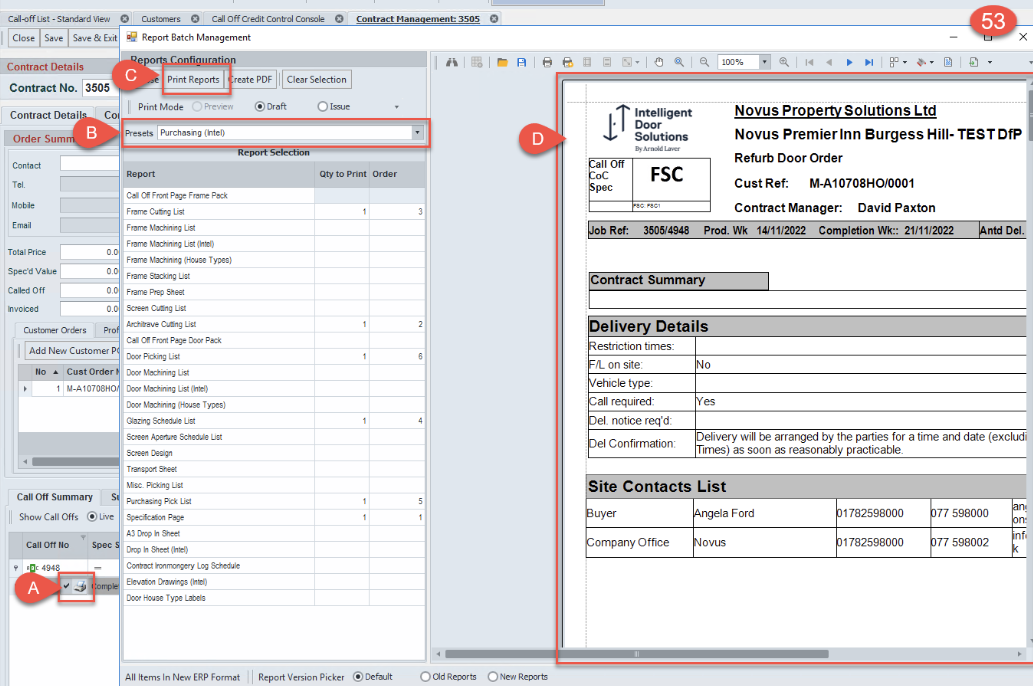
- select the printer icon
- select Sales Doorset checking list (intel) from the pre-sets drop down
- select print reports
- paperwork PDF appears, view this here checking what you have entered is all appearing correctly
How to commit
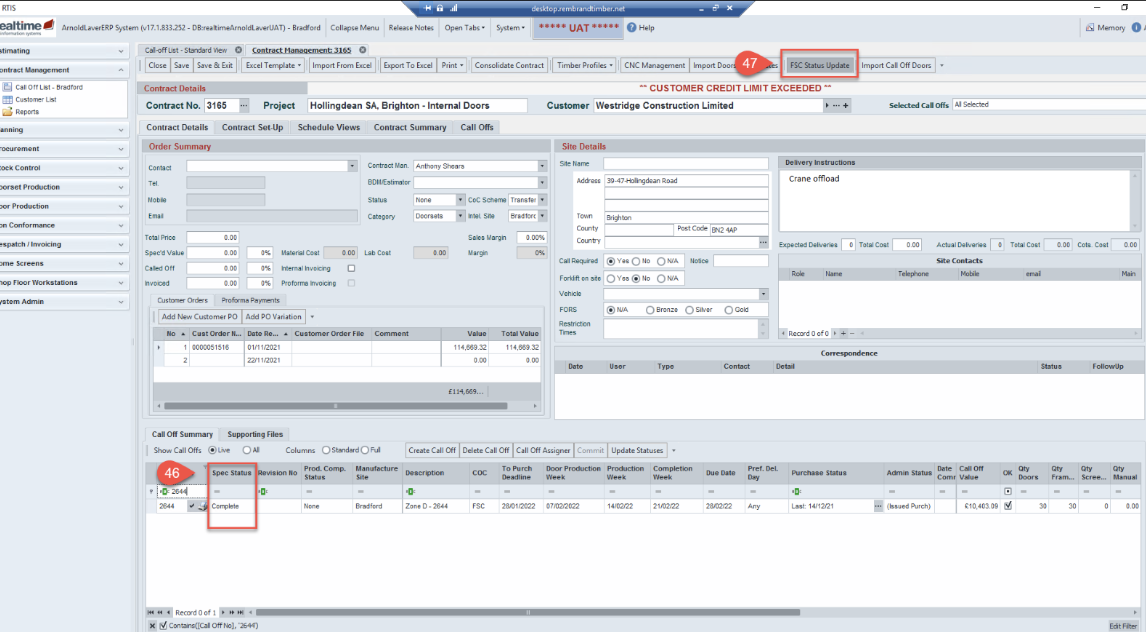
Ensure you have clicked in the correct call off, Change spec status to complete in the call off line
If the commit tab is NOT active hover over it and the reason it is not active shows these can be
- Customer over credit limit
- FSC
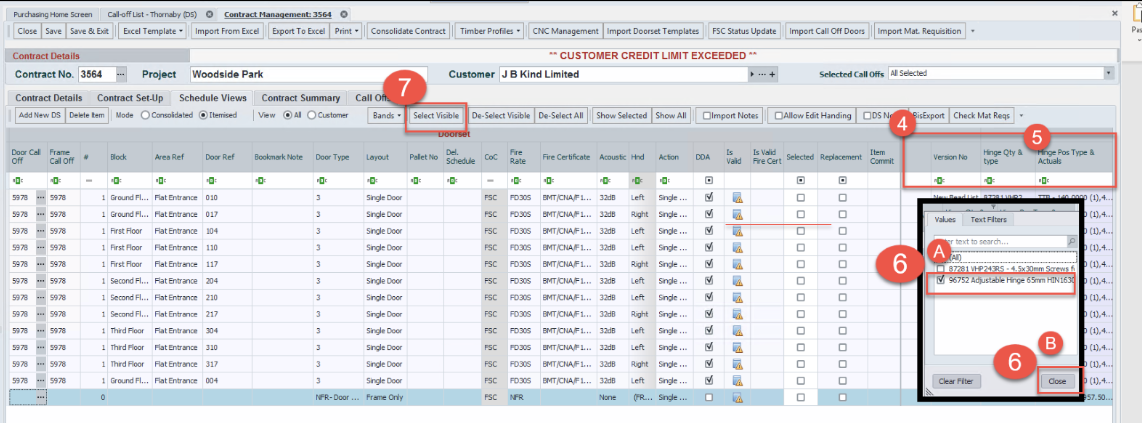
- Unspecified items if unspecified items follow the below to locate where in the call off these items are
a. Select schedule view
b. Ensure viewing the required call off
c. Select Select visible tab
d. Select Mat Reqs tab this now runs a check to locate where the unspecified items are
e. Pop up window confirms it has found errors these are highlighted in red
Open the doorset and correct the errors identified
Call off line is now a darker grey and no further changes can be made commit tab changes to being greyed out
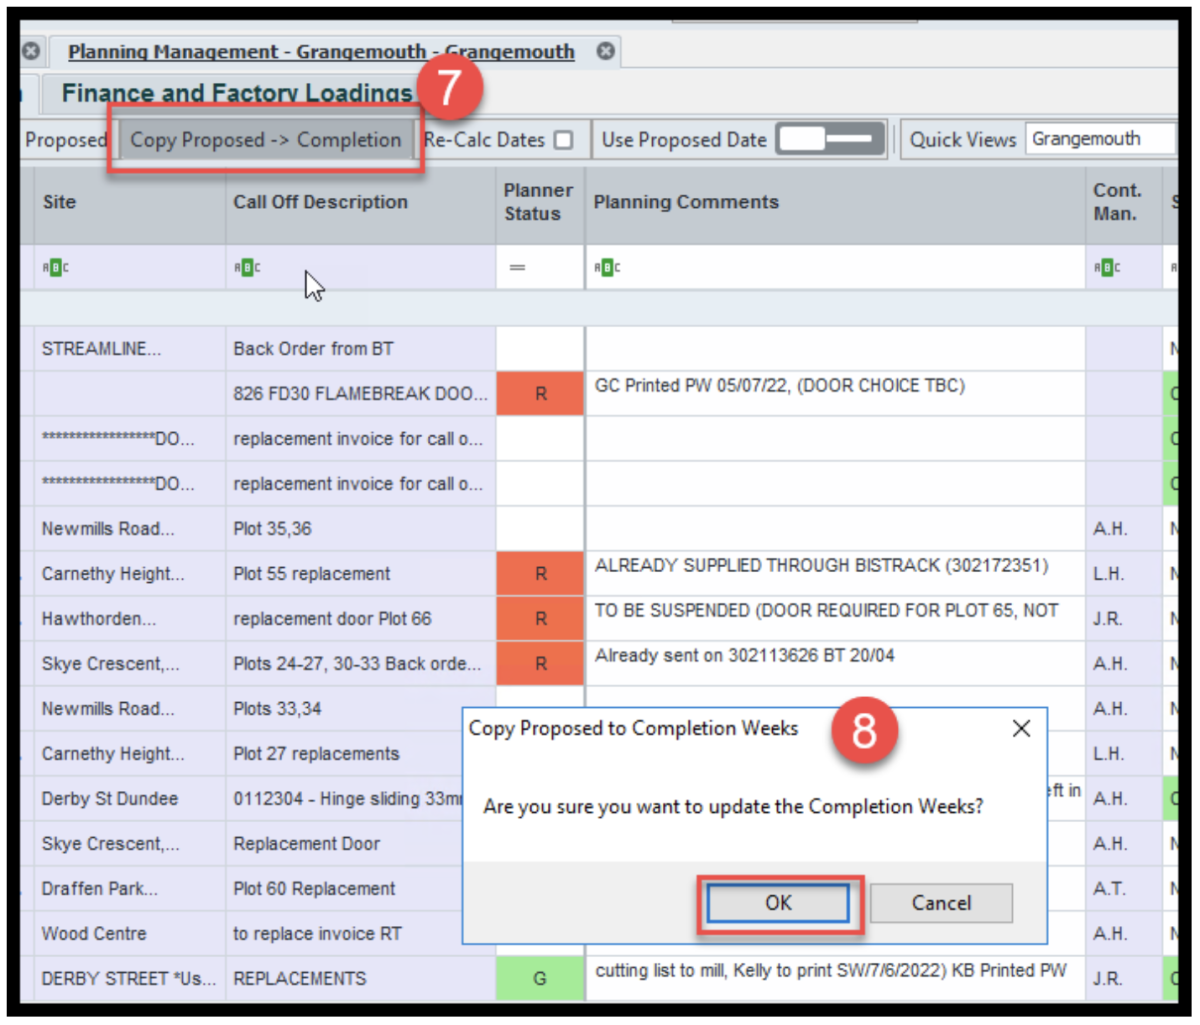
Now release the paperwork for printing by clicking in the revision No column and release paperwork
Save
The production paperwork will be printed and given back to Scheduler for a final check before handing over to production for manufacture
How to create a call off using Housetype selection
Before starting a call off checking and preparing the handover documents will save time, this ensures you have the relevant information to enter Rtis. Below are a few contact suggestions for missing information
- Thoroughly check the handover documents, communicate with the estimator and salesperson for clarification or missing information
- There may be a need to communicate with the customer to obtain some details
- For technical information refer to the technical standards are on Mondays.com board by following this link https://national-timber-group.monday.com/boards/762495528
- For additional technical support contact joanne.hardy@inteldoors.co.uk or david.hallam@inteldoors.co.uk
If you have any doubt about information or products, please DO NOT guess ask for help
Creating a call off
Open the contract the call off is to be created in
Select the correct COC for the call off (this will be FSC/PEFC for all except Grangemouth as no certification in place now)
Enter the lead times by selecting the correct date in the Production week column
Individual site will have different lead times these will be agreed, and rules set up in Rtis to reflect these
If this calls off has a requested alternative delivery address complete this field refer to the full process steps in this link 46-How to Add an Alternative Address v1.1.docx
Save
Add the doorset/door /frame requirements
Select House type management tab
Select add a house type this generates a blank house type
- Replace (new house type) with the actual house type name
- Replace (new plot) with plot number /name
- As/opp this is reference the handing the first plot is known as the AS ( as the drawings) subsequent plots are to be selected as per customers’ requirements for the plot select here from the customers drawings
- Call off column will be populated once this plot is assigned to a call off
- Desp. Column give the despatch status of the call off
Door set Specification window now opens ready to input the specification required by customer – complete all relevant fields starting at the top
Doorset selector section here select either doorset or door/frame and enter the pricing details from the handover document
General Specification – complete all fields as per the handover document
- missing information from the handover document this will need to be obtained before proceeding
- For technical information refer to the technical standards are on Mondays.com board by following this this link https://national-timber-group.Monday.com/boards/762495528
- For additional technical support contact joanne.hardy@inteldoors.co.uk or david.hallam@inteldoors.co.uk
Doorset Notes This is where you can add your already set up notes into the doorset. This link is to the process document How to add a note to doorset spec v1.docx
Product Range = Catalogue door from supplier i.e., Vicaima /Premdor
- Service option – are standard options that supplier offers
Bought in Bespoke = is a way to buy from a third party (only to be used in exception when Inteldoors cannot fulfil the requirements)
Frame Specification – In this section the intumescent strip information is displayed changes to colours are made here
Frame Comps and Arch Comps tabs – check correct entries pulled through amend any requirements as per the handover document
Ironmongery – here selection is made from the earlier set up of the ironmongery.
A reminder of how to set this up follow this link How to set up Ironmongery.docx
Additional ironmongery can be added by selecting the add iron item/add iron pack
A select add iron item
B select the … to add
By selecting the spy glass and the drawing, images can be viewed of what the doorset will look like
The Valid warning at the top of the doorset starts off as Red and it should turn to green upon completion of the doorset, if still red select the warning this will open a new window
This new window will detail what is causing the warning to still be red, these needs investigating and resolving before proceeding
- Check your entries
- Check the standards
- Request technical help
- Request help from the Rtis hep desk rtissupport@nationaltimber.co.uk link for how to use the help desk click here 5.How to – Get Rtis help-support-ask a question v1.docx
Once the valid/invalid warning is green, select the view material requirements tab this will go dark grey whilst Rtis checks all requirements, this can take a few minutes as the systems checks the call off
When complete a new window opens any unspecified items will be highlighted in yellow, these need to be addressed before proceeding
- Check your entries
- Check the standards
- Request technical help
- Request help from the Rtis hep desk rtissupport@nationaltimber.co.uk link for how to use the help desk click here 5.How to – Get Rtis help-support-ask a question v1.docx
Once the first doorset has been created house type management has several features these features, and tabs are explained below
- Add House Type – select this to add a housetype
- Duplicate HT – by selecting this tab the house type will duplicate
- Duplicate HT from order – this will duplicate a house type from a different call off see steps 33-39
- Delete HT – this will delete the selected House Type
- Add Plot – adds plots to the selected house type
- Delete a plot- this will delete the plot selected
- Add new doorset - by selecting this tab a new doorset will be added
- Duplicate a door set – when this tab is selected it will duplicate the doorset
- Delete a doorset -if required
Duplicate HT from order
Note the contract number and call off number to be duplicated
Select the duplicate HT from order tab
From the contract No field select the drop-down arrow
This opens new window - search here for the contact and select open
This then populates all the call offs into the scree
Locate the call off required and click on the select grey button
This then add this housetype to your current contract
Assign to a call off
Items to be assigned will be highlighted in red in the tab check this is correct and select to assign to call off
How to produce schedule to send to the customer
- Check the selected call off is correct
- Select print,
- select the correct required schedule dependant on what is on the call off this will generate the schedule ready to send to customer
- select load template
- select create schedule
- select Save as Excel this document and tidy up before sending to the customer for approval
Once the customer has confirmed the schedule is correct proceed to committing the call off
How to commit
The commit button will now be active select this it will go dark grey whilst it processes to committed. Message appears to confirm committed
Call offline is now a darker grey and no further changes can be made commit tab changes to being greyed out
Click on the
- click on the select all tab,
- then select the regenerate selected tab,
- message appears are you sure you want to recreate the purchase requirements click OK
- message will appear update completed
- select ok
Now release the paperwork for printing by clicking in the revision No column and release paperwork
Save
Check and review the Sales Doorset checking list (intel) pack paperwork
How to correctly enter a FD30`s smoke seal to doorset spec
In Rtis/Realtime
Menu selected Contract Management ……………Topic from within Menu…Call off List – House type management - doorset
These steps from within the doorset spec window will ensure that the correct smoke seal is selected whilst entering the detail in the general spec section of the doorset
Select the fire rating from the drop down arrow
Select FD30s
In the SMK seal box select from drop down arrow Fin
Navigate to the right hand side of the window inline with the frame specification section
Select frame comps
Select Int Strip
Change Jamb Primary in drop down to 15 x 4 Pyroplex offset flipper
Go to Jamb secondary in drop down and change to 15 x 4 Pyroplex offset flipper
Select head in drop down and change to 15 x 4 Pyroplex offset flipper
Save
How to create a loose item
A loose item is a product that does not need manufacturing such as.
- A door only
- Ironmongery
This is created from the call off line by following the below steps.
Create a new call off in the normal way
If more items are required repeat the above steps until all loose items have been added
Pop up window appears asking are you sure you want to recreate purchase requirements select OK to continue
A new pop-up window appears after a few seconds saying update complete OK select ok to continue
When a call off is to be delivered direct from supplier to customer
Select the drop-down arrow in the admin status column and select Direct Dly this will be clear to purchasing – planning and transport that the supplier is delivering these goods
When the call off is free of charge for the customer
If this item is authorised as free of charge for the customer tick the FOC box this then does not affect the credit status of the call off credit control do not see a call off that has this ticked
When a call off is of high priority and requires purchasing to act upon straight away
- In the description column enter AFTERCARE 12345(aftercare related no)
- Once call off complete email purchasing @inteldoors.co.uk /flag to your onsite purchaser that this is urgent
- in subject field of email write aftercare
- in email enter call off number and request urgent attention
- if your onsite purchaser is not available by emailing the purchasing inbox this will be pick up by a member of the wider purchasing team as a matter of priority
How to Import Doorset from template
- Templates are used when regular repeat orders and specification for a door type are the same, this saves schedulers time allowing call off`s to be processed more efficiently.
- Template set up can be requested by logging the request at rtissupport@nationaltimbergroup.com
- This feature is for Architectural orders as the copy feature in housetype is the same principle
This opens a new window which lists all the templates Search for the template required and click on select and click done
How to Globally make changes
Global changes allow changes to be made to the whole contract without having to open and amend every doorset. Follow the below steps to complete this process, the example used in this document is to change the ironmongery, the principle is the same when making other global changes
*** care must be taken here as changes here will change every doorset***
- Help can be requested by contacting rtissupport@nationaltimbergroup.com
Select the filter feature from within the header column, this details what is available to change
Select multiple updates which opens new window - here is where the qty`s in step 8 should match - continue to make the global changes
- Global changes can only be made in areas detailed in this screen
Go back to schedule view and check the changes have been made
- In step 5 the filter was selected to what was to be changes
- Remove this filter which will reveal the changes made
- Using the de – select all tab and show all tab will reveal all
Areas to double check
- Remove the filter or de select all and show all
- Check hinge column has changed
- Check QTY`s correct
How to Create a Proforma Invoice
Proforma payments are taken from customer who do not have a credit account, below are the process steps that are required to create this type of order
Create the call off in the usual way, after assigning products to the call off continue with steps 1 to 15
Select the … in the in the proforma window cell this generates the next proforma sequential number
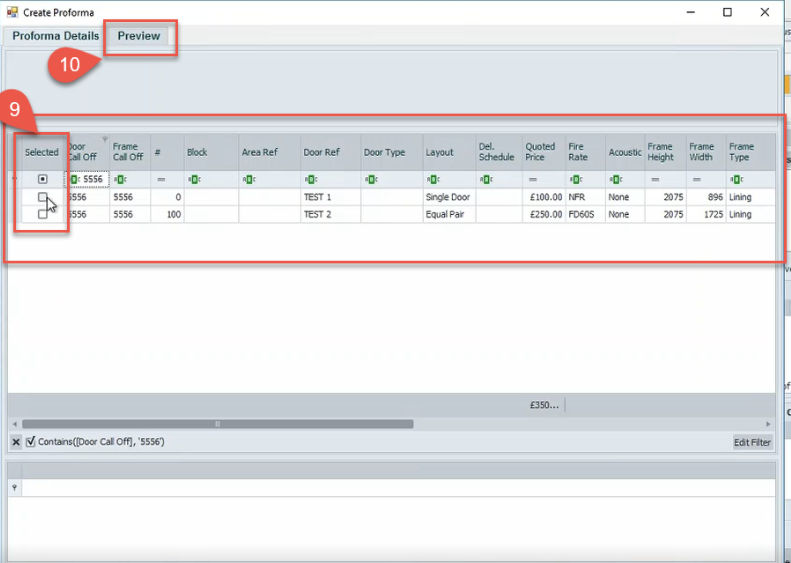
This opens a new window showing detail of all the product on the proforma, search for the call off you have just added
Select the spy glass document this will open the actual PDF this is then saved in project folder ready to send to the customer
What to email to customer?
- PDF of proforma invoice
- State clearly on email asking customer to notify scheduler once they have made a payment
When the customer confirms payment has been made contact Tom Smith in credit control will confirm this has been paid and release the order for scheduler to proceed
Proceed to committing the order and updating the statuses in the call off
How To - Un assign a call from a batch to re assign on to another Batch
Select visible to unassign tab and select the correct selected based upon what is on the call off
- Doorset
- Doors
- frames
How to add screens to an Architectural call off
- Screens are added by trained and experienced schedulers Joanne Hardy has a list of authorised schedulers to complete this process to find an authorised scheduler please contact joanne.hardy@inteldoors.co.uk
- This link is a video demonstrating the process for adding screens https://youtu.be/CTpt1B3e3i8
In preparation for following the video create call off as normal, from within the doorset specification once the frame specification has been entered , select the convert to screen and follow video
How to Un commit a call off
Only authorised persons can uncommit a call off. Before un committing a call off it is important to check the admin status
- if the status is at issued to purchasing, purchasing need to be communicated before any changes are made to the call off
- Status is at Issued to the factory - it is essential that the paperwork is retrieved, and that factory and purchasing are communicated with before any changes are made
How to view the Admin status of a call off
How to Un commit a call off
Select the call off ***note here the…
- Revision status column this as a number which states how many times there has been revisions made to the call off
- Un Commit is greyed out which means until the paperwork has been recalled the option to Un Commit is not possible
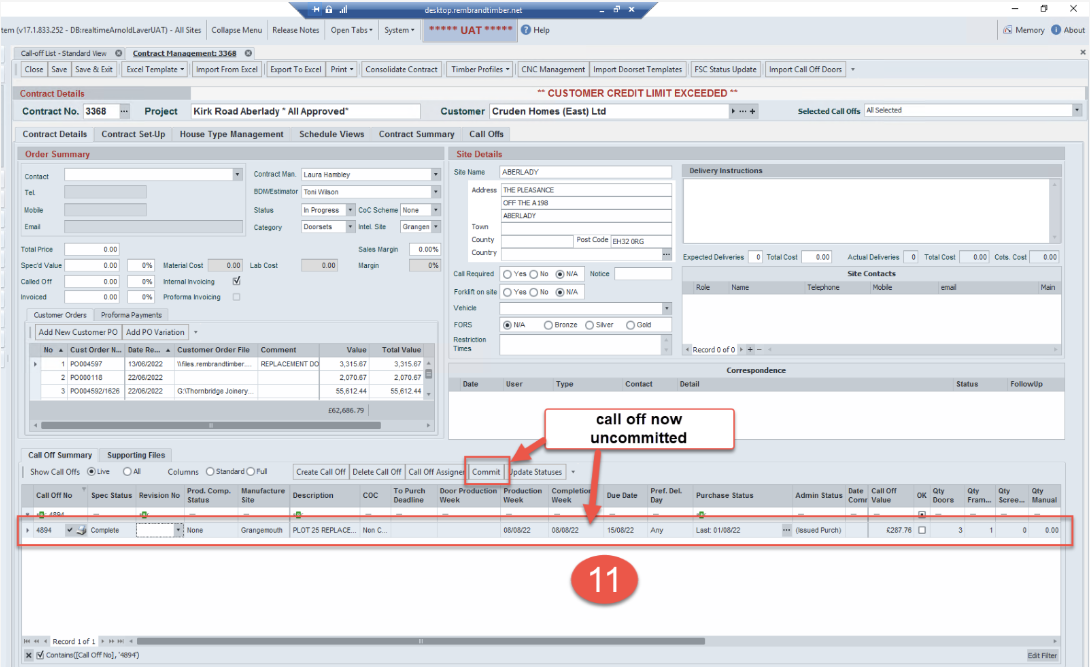
Select the active uncommit tab
Note ***
- The revision No column no longer has a number in the field
- The Un Commit tab is now active
How to Suspend a Call Off
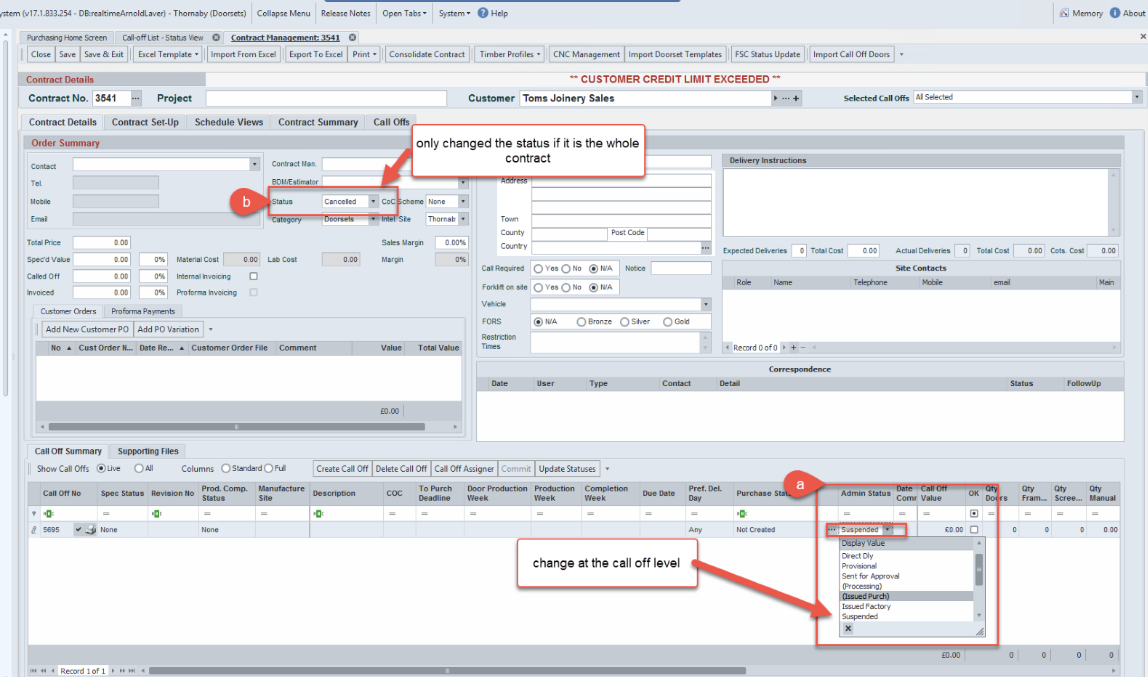
Call off and contracts cannot be deleted in Rtis. The steps below show how.
- A call off can be suspended
- How a contract can be cancelled
Suspend a call off
Search for the call off that is to be suspended
Select Save
How to cancel a contract
A contact can ONLY have a status of cancelled if ALL the call off`s are all suspended
Select Save and exit
How to add an Alternative address
Before changing the address, it is essential that the status of the call off is checked the below steps cover all status
Admin status at issued to purchasing covering Direct deliveries
Unless this is a direct delivery changing the delivery address does not affect purchasing
If this call off is a direct delivery, speak to purchasing before any changes are made to the call off
If purchasing has not placed the purchase order to the supplier proceed to steps 10-16
Admin status at issued to factory
Recall and replace the transport sheet that has been issued to the factory
Communicate with factory to let them know that the delivery address is being changed and to destroy the current transport sheet in the production pack
Communicate with team that print the production paperwork to let them know the below.
5.1- Changes are being made to the delivery address
5.2- Once you have changed the address, inform team who print paperwork that the NEW transport sheets are ready to be reprinted and taken immediately to the factory
Once step 5.1 is complete proceed to change the delivery address by following steps 10-16
Despatched but NOT delivered or invoiced
Recall and replace the despatch Note and transport labels
- Communicate with transport to let them know that the delivery address is being changed and to return the current despatch note
- Communicate with the factory to let them know that the call off will need its transport label changing due to an address change
- Communicate with the team that creates the despatch note that the address change is to happen
- Once you have changed the address, inform team who print paperwork and who create the despatch note that the NEW documents are ready to be reprinted and taken immediately to Transport and factory
Once the above communication has taken place proceed with making the address changes by following steps 10-16
Invoiced status
Once a call off has been invoiced a delivery address CANNOT be changed if the goods are to be returned and re delivered follow the returns process
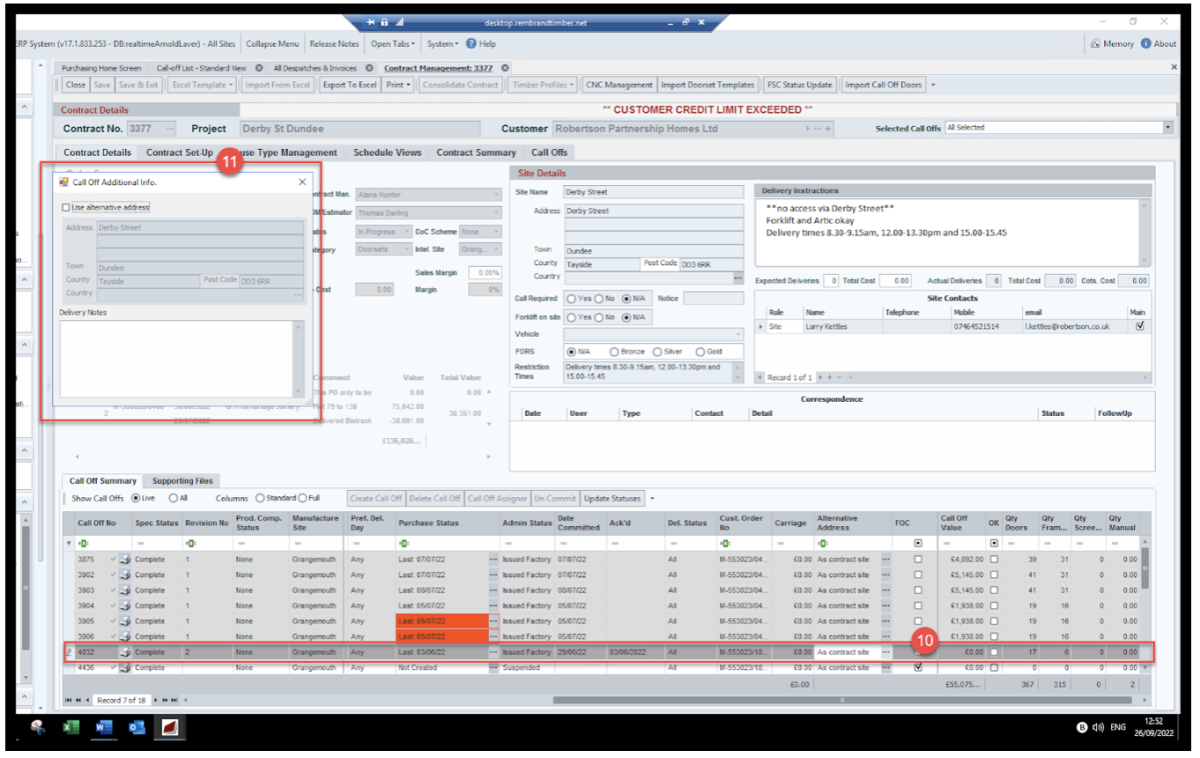
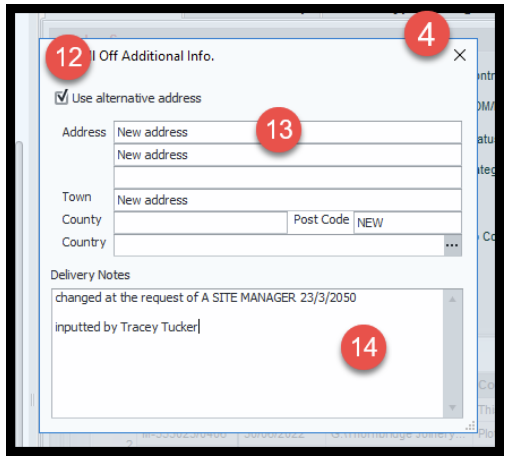
How to change a delivery address
In the delivery notes field include details of who requested the change and who made the amendments
Close the window by selecting the X
Check the alternative address column this should now be RED and read site New Address, save and exit the call off
Inform Paperwork/despatch/factory/transport teams that the address is now changed in the call off and that the relevant new paperwork can be printed and used straight away ensure all old paperwork is collected and disposed off
Order Type what paperwork to print -Grangemouth Process
Type of order |
What paperwork to print |
Loose Items can Include …
|
Show as loose items which is only seen on Drop in sheet |
Architraves |
Architrave cutting list |
Door Only |
Select House Type ( doors only) |
Frames Only |
Select House type (Frames only) |
Doorset |
Select House Type ( Doorsets) |
How To - Print production paperwork using doorset printer button
Menu selected…contract management………Topic from within Menu……call off list
Search for call off and open selecting the … before proceeding to check at call offline at the very far left for the total number of doors, this will enable you to print the correct number of pallet labels – make a note of the numbers
Select call off tab
Ensure call offline is high lighted
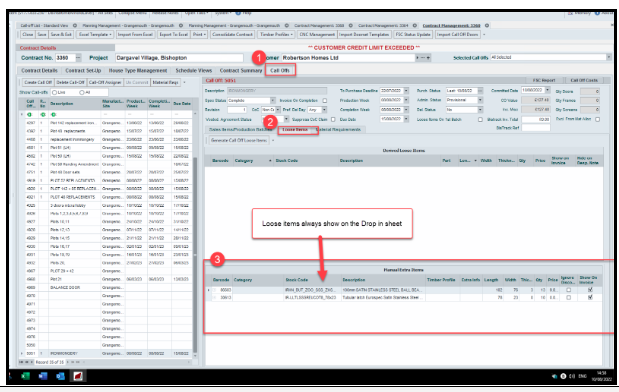
Before printing check for Loose items select the Loose items Tab (see screen shot 1 below)
If there are loose items these will be shown here – ensure when printing that the drop in sheet is printed as this is the only place in the paperwork where these are seen
Select the printer icon next to Doorset this is far right – note we never use door
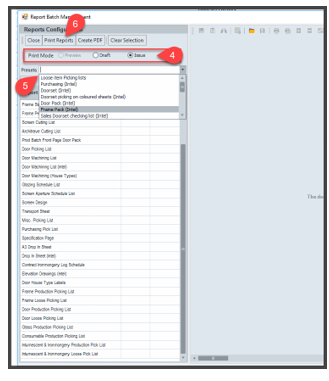
New window opens
Ensure issue button is selected this will ensure paperwork does not have draft copy on
Select from drop down arrow doorset house type for doorset this is right at the bottom of the selection
If doors only select doorpack housetypes
If frames only select frame pack housetypes
When a call off is for ironmongery only or loose items – ensure that the Drop in sheet is printed this ensures production see all requirements
The paperwork selections are now auto populated deselect labels if selected
- Labels must be printed separate from the selection on the right-hand side of screen
Ensure House type Drop-in sheet is selected and always printed. Loose items are always on the last page of the Drop in sheet
Select issue from the print mode
Select print reports tab this generates the paperwork – select the correct printer and ensure the printer only prints single sided and print and close window
Print the house type labels separately from the right-hand side of the screen by clicking on the + button this generates the labels
Select the correct printer - select two copies for door sets – select tray 2 from the printer source area
Prepare the pack for production in the following order
- Front address sheet ensures that there is enough for each pallet and only one plot per sheet
- Door pick list
- Door machining list
- Drop in sheet
- Misc pick sheets
- Door labels
In a sperate clear pocket
- Frame machining
- Architrave
- Frame labels
- Paperwork handover sheet
- Loading sheet
Place paperwork in clear envelope red for a screamer white any other with a label with the date and day on
Pass to sales support person to check – then hand to Planning (SW)
How to View credit status and get an order released by credit control
In Rtis/Realtime and Manual via email
Menu selected Contract Management ……………Topic from within Menu…Customer List….
The below steps will show you what the credit status of customer is and who the credit controller is these septs are used when entering a new contract if the first page of the contract set up has a credit red warning follow the below steps before proceeding with sending Material schedules that the BDM send to the customer
- Step A - is view credit status and who is the credit controller
- Step B - is the manual process for content on the email to credit controller
How to view credit status and who is the credit controller
manual process and content on the email to credit controller
Email credit controller
Copy in BDM
In subject matter type the following:
- Customer name
- Contract number
- Call off number/s
In the body of the email include the below:
- Call off dates
- Ask for order to be released
Set a reminder flag for 48 hours after sending email to chase:
- Select follow up flag from top tool bar of email
- Select add reminder
- Select a date to be remaindered 48 hours away
- Adjust the time by selecting a time from the drop-down arrow
- Click OK
C - View call off on credit hold and export to excel
How to use Internal Invoicing Box Grangemouth ONLY
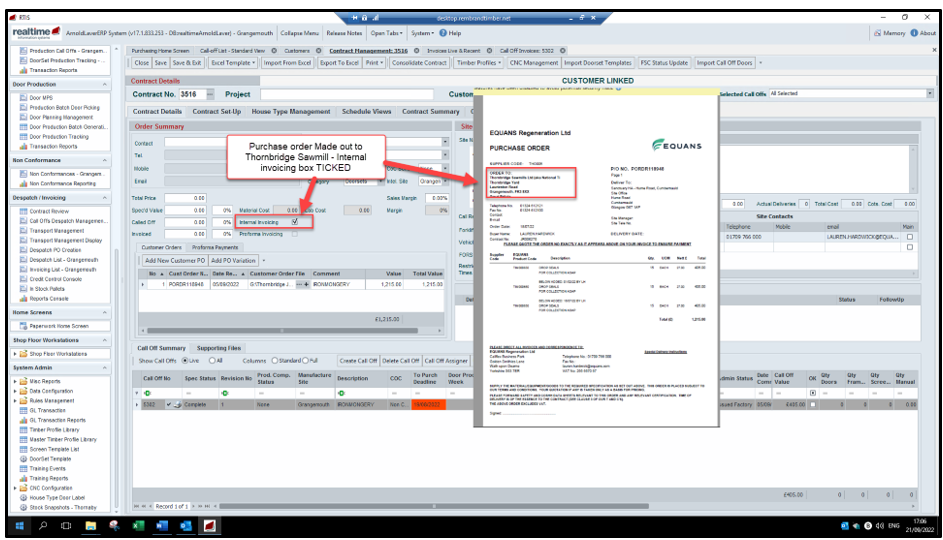
The internal Invoicing tick box is a way to flag to accounts whether the customer receives an invoice from Thornbridge sawmills or Arnold laver.
- Box ticked means that the purchase order the customer has supplied is made out to Thornbridge Sawmill
- Box unticked means the purchase order is made out to Arnold Laver
It is extremely important that great care is taken when creating contracts and receiving purchases orders. there CANNOT be a mixture of Thornbridge purchase orders and Arnold Laver purchase orders on one contract.
If a customer has started to issue all new purchase orders made out to Arnold Laver a new contract must be set up and the internal box NOT ticked
EXISTING CUSTOMER
Check if the internal invoice box is ticked or not
If ticked any new call offs must have Thornbridge sawmill purchases orders
- If the new PO is made out to Arnold Laver, then a NEW Contract must be set up ensuring the internal invoice box is NOT TICKED
If the internal invoice box is NOT TICKED, then the call off must have PO `s made out to Arnold Laver
Contract Delivery
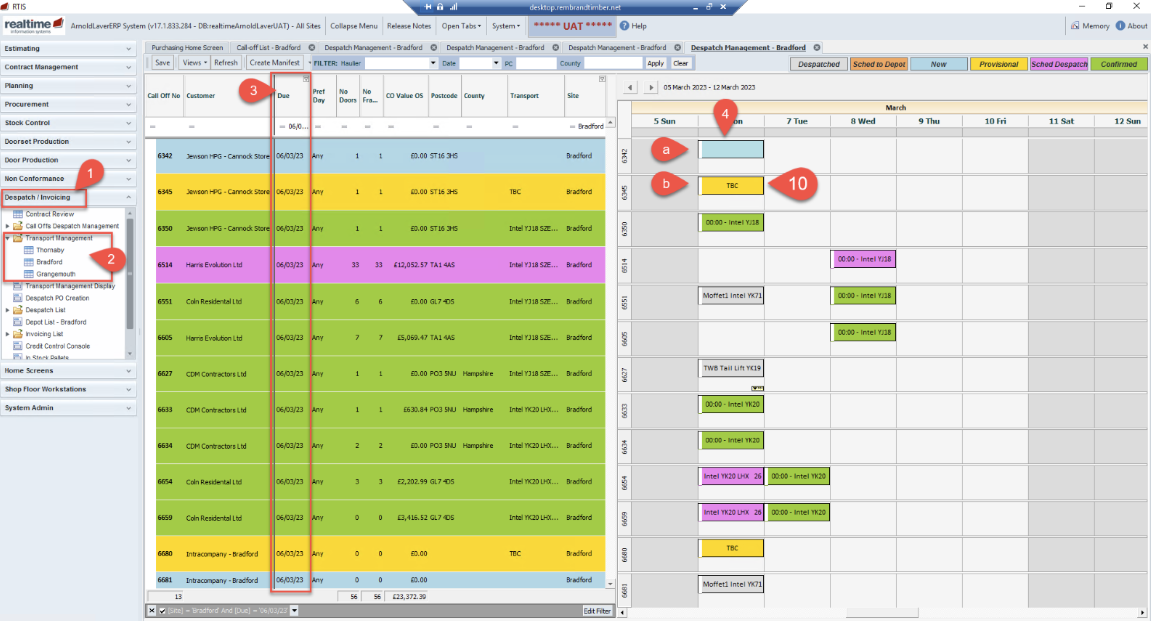
How to View delivery dates in Transport
- This view shows exact status transport are at with a call off
- Communicate in the normal way with transport should clarification is required, or the customer is requesting changes to be made
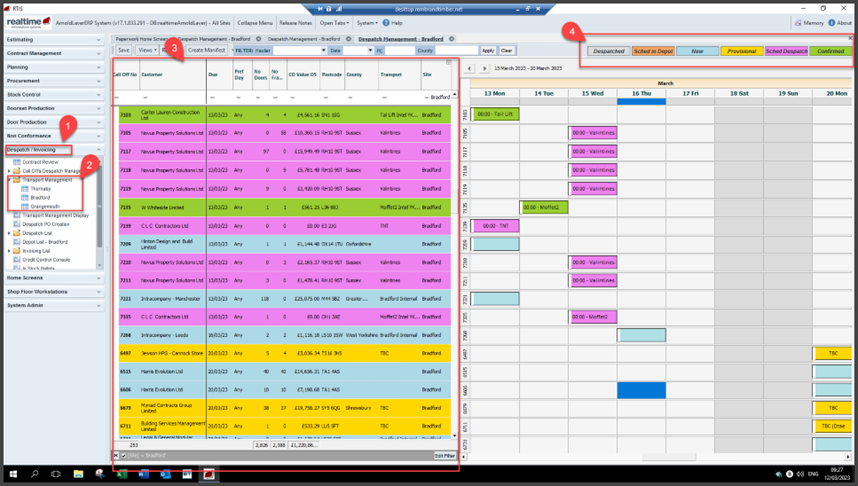
The right-hand side of the screen will show the exact status as per colour coding
a. Blue = New – customer has not yet been contacted to book in for delivery
b. Yellow = Provisional – customer has been contacted by contract delivery and has confirmed they are ready to accept delivery as per the week commencing date – Transport has not yet agreed what day this will be delivered
c. Purple = Transport has planned to delivery on this day however the customer has not yet confirmed they can accept delivery on this day
d. Green = Transport has checked in with customer and they have confirmed to receive delivery on this day
e. Grey = Delivery has been despatched in Rtis
How to view status of call off and production tracking
Follow the below steps to search for delivery dates.
Also check with Purchasing, Planning and Transport to see if any dates are likely to change
Status view of a call off
The call off full status are viewable here the due date column is the date the goods are due for delivery this is a week commencing date, speak to transport for actual delivery day
Admin status – show where the call off is
OTHER Status explained
Purchase Status -
Green = all goods received and complete
Amber = being processed
Material Status - Green = materials received Amber =Po placed Red= Material overdue
Material Picked – Green = all Products picked - Amber = Products part picked ( this will mean there will be goods to follow) - White –not picked yet
Production Complete – This information comes from the scanners in the factory, if your site uses scanning then this field will be relevant Green = All picked
Despatch Status
Invoice Status
Bristrack Ref – This is for Grangemouth use only – this show the Bistrack No the customer has been invoiced on
C/C Status
Production completion=
Scheduled despatched = when transport schedule calls off for despatching this updates this status
- None – transport have not planned anything
- New = this is a new call off and no communication has taken place yet with the customer
- Provisional = customer has been contacted by contract delivery and has confirmed they are ready to accept delivery as per the week commencing date – Transport has not yet agreed what day this will be delivered
- Scheduled despatch = Transport has planned to delivery on this day however the customer has not yet confirmed they can accept delivery on this day
- Confirmed= Transport has checked in with customer and they have confirmed to receive delivery on this day
Scheduled despatched date = this will be populated with the date transport has scheduled
Despatched status = this when the call off has been despatch in Rtis
- None = nothing despatched in Rtis
- Part= the call off has been part despatched in Rtis this means that there will be a balance /goods to follow
- All= all goods have been despatched in Rtis
Invoice status= shows status if invoiced or not
- None= not invoiced
- Part= only part invoiced
- All=all goods on call off invoiced
C/C Status= credit control status
- Blank= no credit control hold
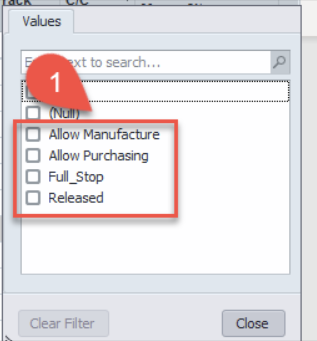
- Allow purchasing = will only allow the call off to be progress as far as purchasing
- Allow manufacturing = will only allow the call off to progress as far as production
- Full Stop= the call off will not be allowed to commit
- Released = this means the call off was previously on credit hold and this call off has been
Manu.Site= this shows the site where the call off is to be manufactured
Doorset Production tracking – view progress through production
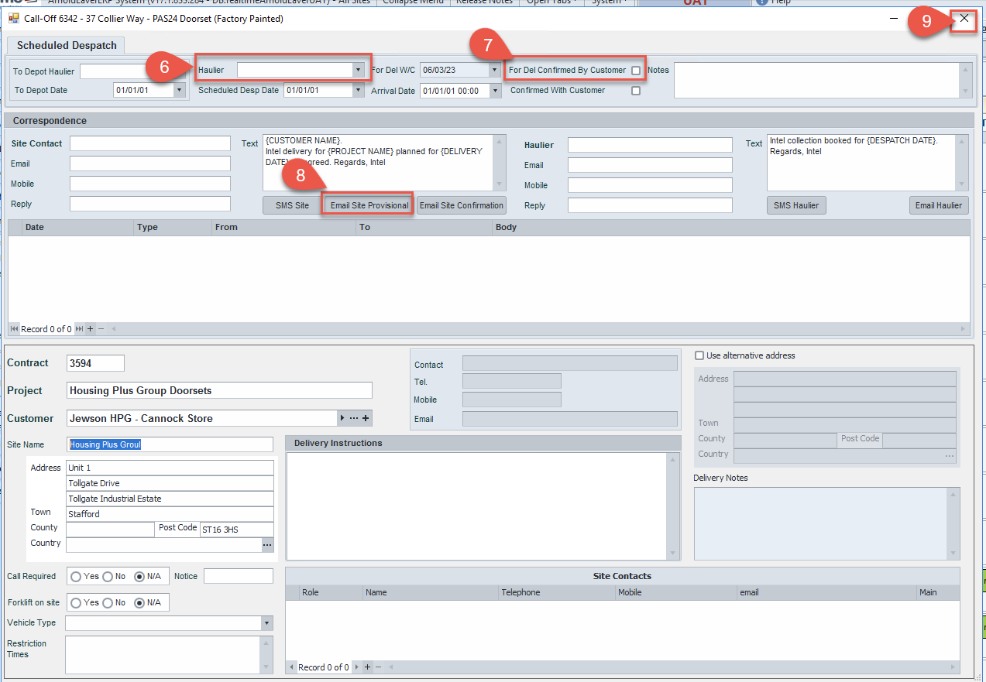
How to Update Transport - Automated email confirmation
Contract delivery will contact customers four weeks before delivery due date to confirm the customer is still requiring this call off on this week commencing date.
Once this contact has been made transport is to be updated by the contract deliver team by completing the below process.
When the customer has confirmed they are happy to take delivery the week commencing date tick the for del confirmed by customer box
View schedule of call off approved by customer
This process is completed by the schedulers and saved in SharePoint/Mondays board, there may be a need to view this when dealing with customer queries. This is what the customer will have approved prior to the call off being committed and sent for goods to be purchased /allocated ready for production
The below steps here will generate the schedule, schedulers will manipulate this export to a more customer friendly view, therefore it is always best to view the one saved in SharePoint that the customer had signed off/approved
How to produce schedule to send to the customer
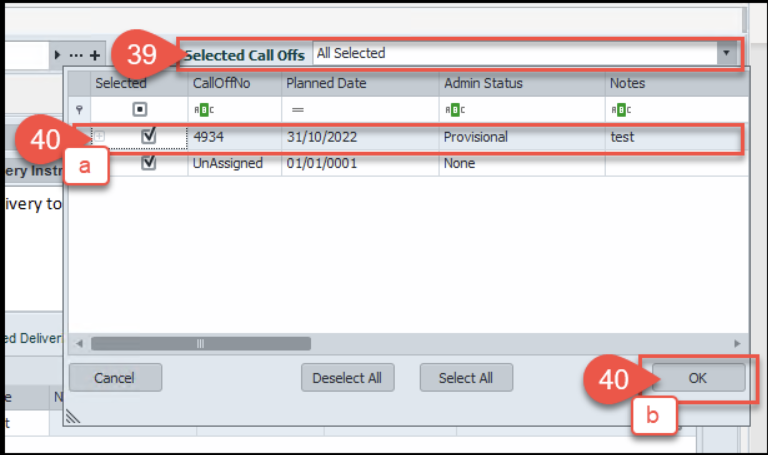
A. Ensure that you only Select the call off required for the customer (NOT unassigned)
B. Select ok
Window closes
a. Check the selected call off is correct
b. Select print,
c. select the correct required schedule dependant on what is on the call off this will generate the schedule ready to send to customer
How to View credit status and get an order released by credit control
In Rtis/Realtime and Manual via email
Menu selected Contract Management ……………Topic from within Menu…Customer List….
The below steps will show you what the credit status of customer is and who the credit controller is these septs are used when entering a new contract if the first page of the contract set up has a credit red warning follow the below steps before proceeding with sending Material schedules that the BDM send to the customer
- Step A - is view credit status and who is the credit controller
- Step B - is the manual process for content on the email to credit controller
How to view credit status and who is the credit controller
manual process and content on the email to credit controller
Email credit controller
Copy in BDM
In subject matter type the following:
- Customer name
- Contract number
- Call off number/s
In the body of the email include the below:
- Call off dates
- Ask for order to be released
Set a reminder flag for 48 hours after sending email to chase:
- Select follow up flag from top tool bar of email
- Select add reminder
- Select a date to be remaindered 48 hours away
- Adjust the time by selecting a time from the drop-down arrow
- Click OK
C - View call off on credit hold and export to excel
How to add an Alternative address
Before changing the address, it is essential that the status of the call off is checked the below steps cover all status
Admin status at issued to purchasing covering Direct deliveries
Unless this is a direct delivery changing the delivery address does not affect purchasing
If this call off is a direct delivery, speak to purchasing before any changes are made to the call off
If purchasing has not placed the purchase order to the supplier proceed to steps 10-16
Admin status at issued to factory
Recall and replace the transport sheet that has been issued to the factory
Communicate with factory to let them know that the delivery address is being changed and to destroy the current transport sheet in the production pack
Communicate with team that print the production paperwork to let them know the below.
5.1- Changes are being made to the delivery address
5.2- Once you have changed the address, inform team who print paperwork that the NEW transport sheets are ready to be reprinted and taken immediately to the factory
Once step 5.1 is complete proceed to change the delivery address by following steps 10-16
Despatched but NOT delivered or invoiced
Recall and replace the despatch Note and transport labels
- Communicate with transport to let them know that the delivery address is being changed and to return the current despatch note
- Communicate with the factory to let them know that the call off will need its transport label changing due to an address change
- Communicate with the team that creates the despatch note that the address change is to happen
- Once you have changed the address, inform team who print paperwork and who create the despatch note that the NEW documents are ready to be reprinted and taken immediately to Transport and factory
Once the above communication has taken place proceed with making the address changes by following steps 10-16
Invoiced status
Once a call off has been invoiced a delivery address CANNOT be changed if the goods are to be returned and re delivered follow the returns process
How to change a delivery address
In the delivery notes field include details of who requested the change and who made the amendments
Close the window by selecting the X
Check the alternative address column this should now be RED and read site New Address, save and exit the call off
Inform Paperwork/despatch/factory/transport teams that the address is now changed in the call off and that the relevant new paperwork can be printed and used straight away ensure all old paperwork is collected and disposed off
How to View Audit log
This process is available to authorised users only. Contact joanne.hardy@inteldoors.co.uk to gain access to this process within Rtis.
How to raise a customer credit against an invoice - Grangemouth Process only
Customer credits must first be authorised by site manager and relevant paperwork completed before being processed by authorised user
Bradford process is in the contract delivery menu section
Search for the invoice the credit is to be raised against and select the row by clicking in the line
Select the + to add a manual credit – here add a description and reason for the credit also include the invoice number
This shows manual entry
The credit note is available here select the three little dots… to view and check the credit note
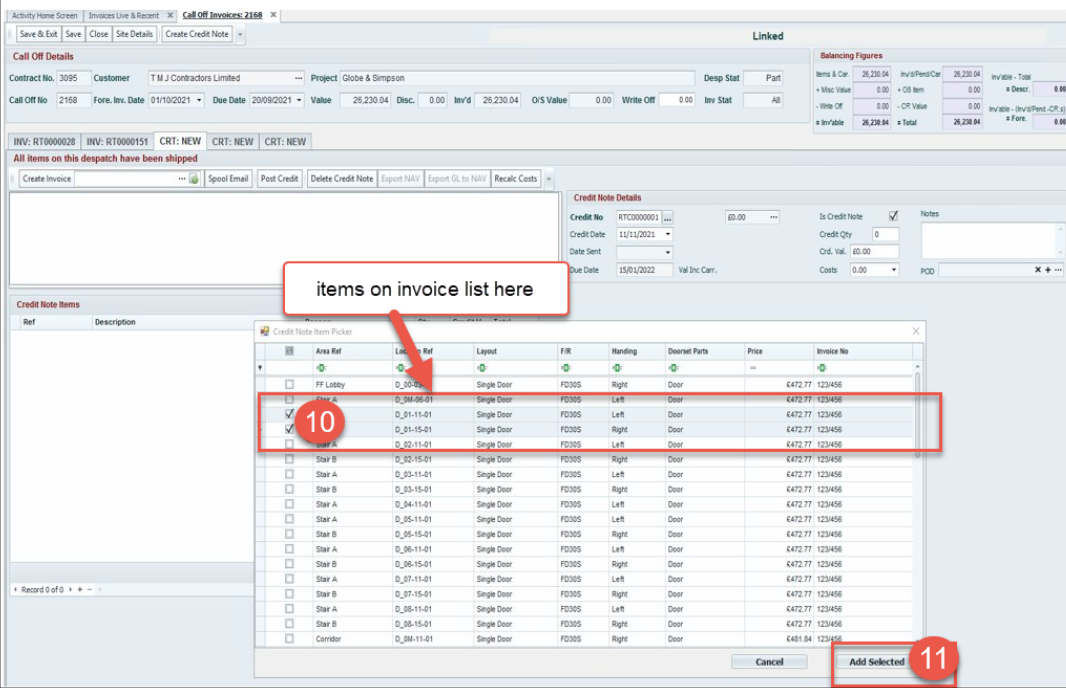
How to create a loose item
A loose item is a product that does not need manufacturing such as.
- A door only
- Ironmongery
This is created from the call off line by following the below steps.
Create a new call off in the normal way
If more items are required repeat the above steps until all loose items have been added
Pop up window appears asking are you sure you want to recreate purchase requirements select OK to continue
A new pop-up window appears after a few seconds saying update complete OK select ok to continue
When a call off is to be delivered direct from supplier to customer
Select the drop-down arrow in the admin status column and select Direct Dly this will be clear to purchasing – planning and transport that the supplier is delivering these goods
When the call off is free of charge for the customer
If this item is authorised as free of charge for the customer tick the FOC box this then does not affect the credit status of the call off credit control do not see a call off that has this ticked
When a call off is of high priority and requires purchasing to act upon straight away
- In the description column enter AFTERCARE 12345(aftercare related no)
- Once call off complete email purchasing @inteldoors.co.uk /flag to your onsite purchaser that this is urgent
- in subject field of email write aftercare
- in email enter call off number and request urgent attention
- if your onsite purchaser is not available by emailing the purchasing inbox this will be pick up by a member of the wider purchasing team as a matter of priority
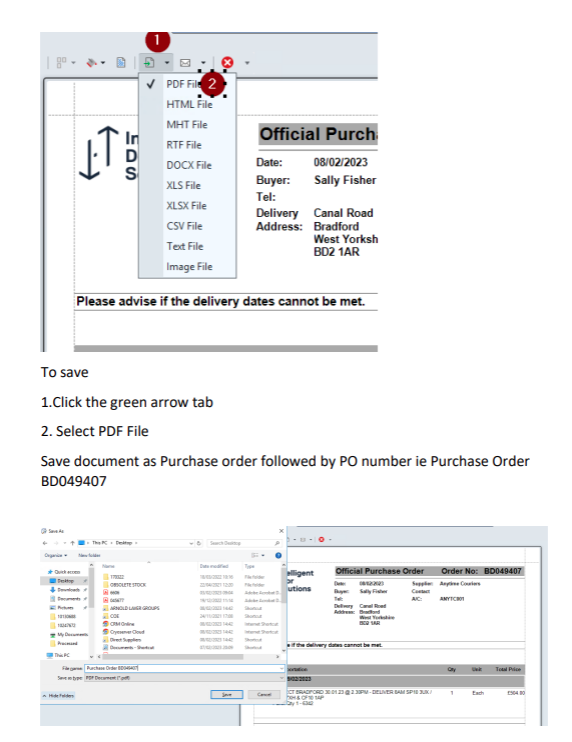
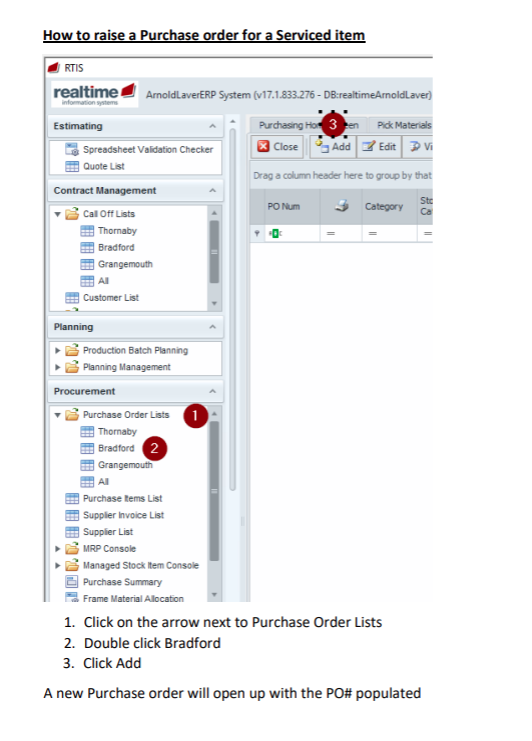
How to raise a Purchase order for a Serviced item
For any queries email purchasing@inteldoors.co.uk for help and advice
How to delete a line in a PO
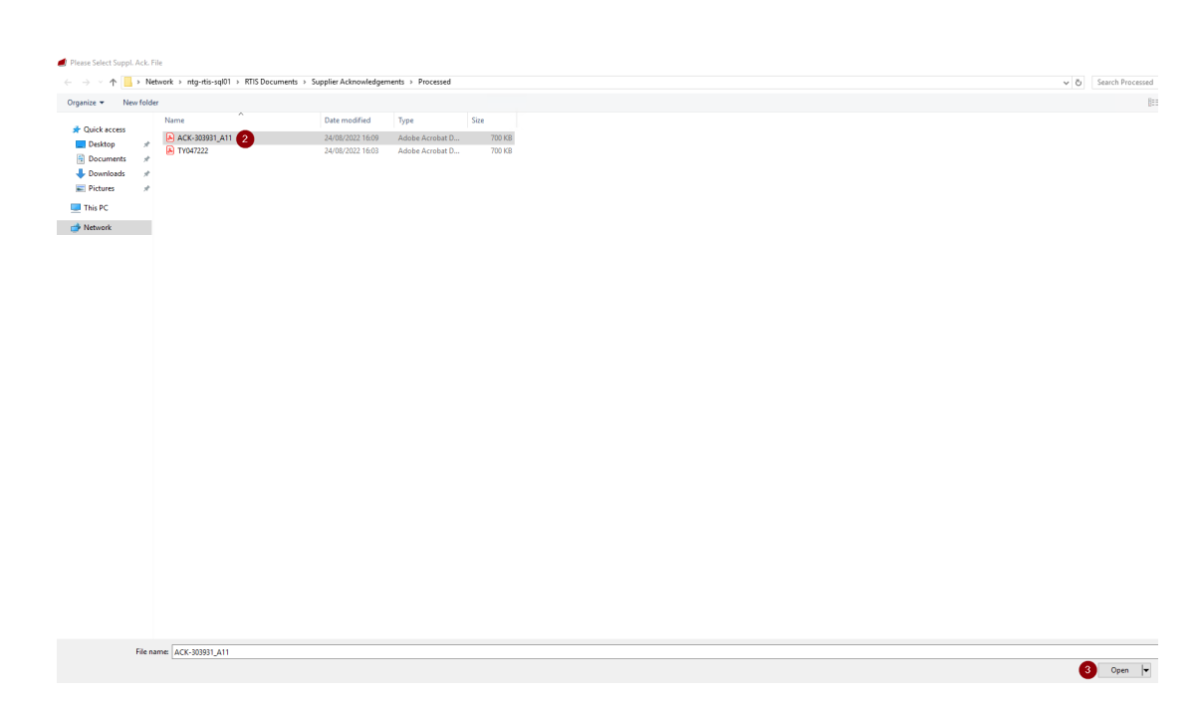
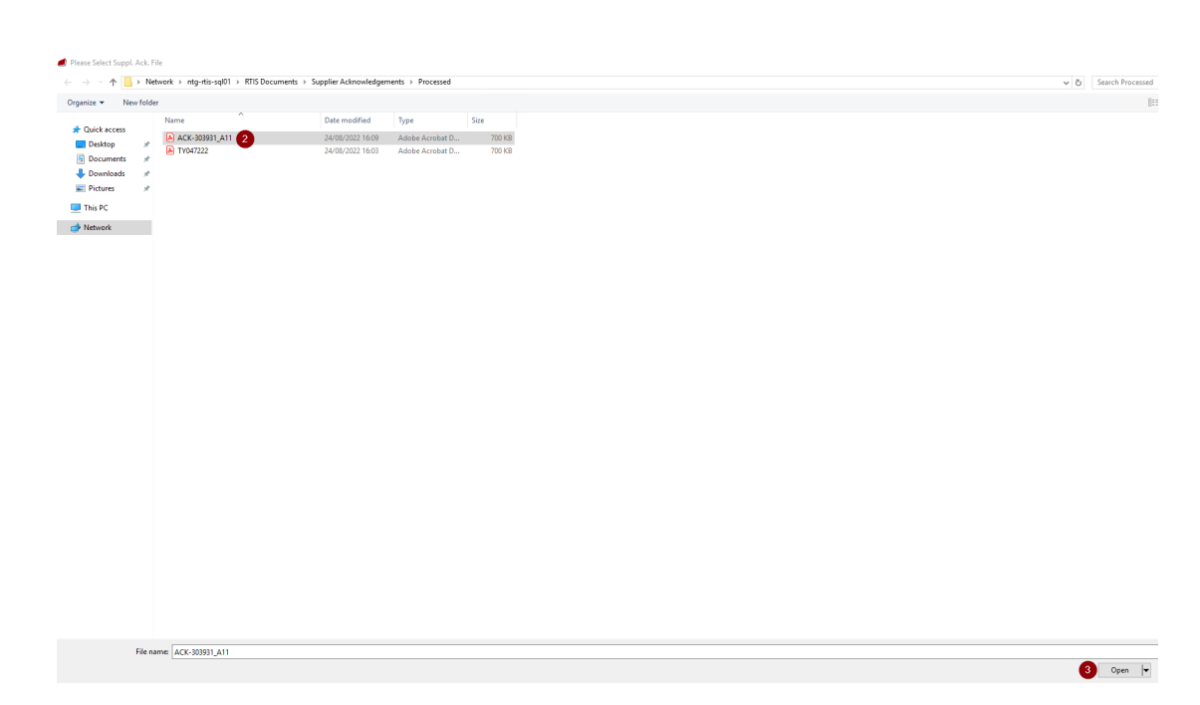
Saving Supplier Acknowledgments
For help and advice email purchasing@inteldoors.co.uk
How to process returned stock
- Before this process is completed in Rtis authorisation by branch Manager/Director must be obtained and this form must be completed 05b.How to Process Returned Stock - Credit-Note-Form_Ver1_Dev3.pdf
- Credit notes are NOT to be issued until the stock has been returned and inspected
- Having access to the original invoice is needed to complete this process
Stock returned needs to be reworked
Issue credit note - completed by authorised branch person link to training document 06.How To - Raise a Customer Credit against an Invoice.docx
Raise a new call off, this allows the goods to be re delivered. To be completed by authorised person
usually scheduler link here to training document 10.How to Create a Loose item v1.docx taking note of steps 3-6 below
In the description of the call off enter “re delivery of call off 1234” (this is the original call off number)
Add misc. item
Copy the description from the invoice for each item
Take the price from the invoice
Stock items Returned
Raise a credit for the customer – to completed by authorised branch person link to training document 06.How To - Raise a Customer Credit against an Invoice.docx
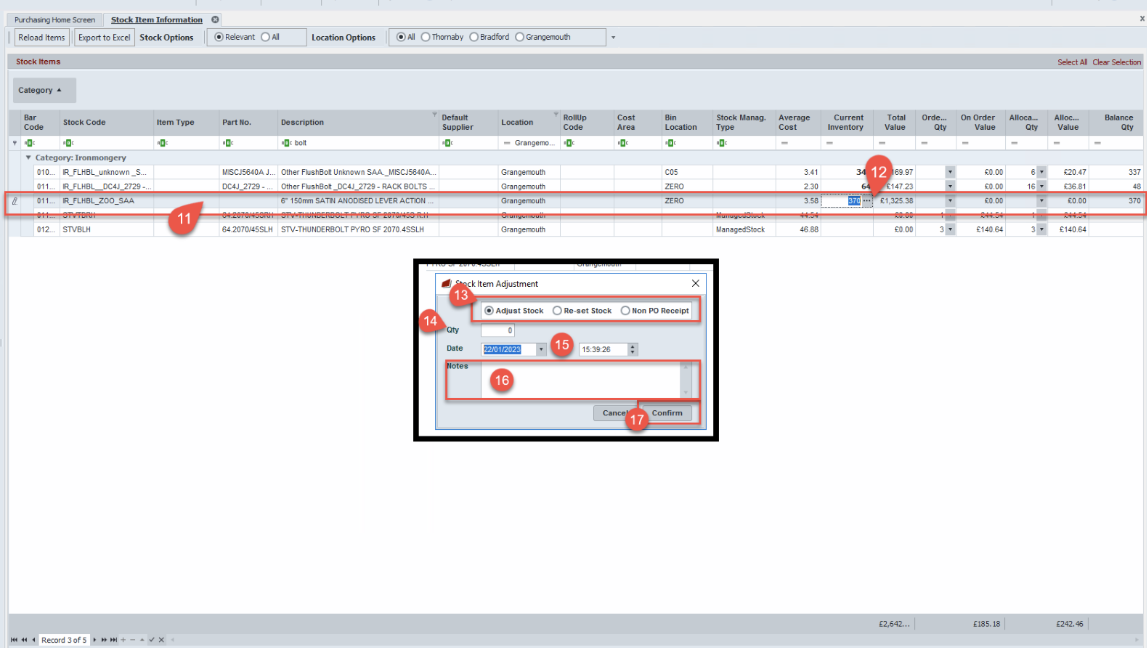
Complete stock adjustment to be completed by authorised person this is usually a purchasing process link here to the training document 06.How To - Complete a stock adjustment v1.docx |
How to process returned stock - credit form
How To - Customer returns manual process - Bradford
This is the manual steps that are required to take place for a customer return. Departments involved are.
- Contract delivery
- Stock control
- purchasing
- Transport
- Goods in
- Management approvals
Customer request return
Contract Delivery –
- Complete credit note form and send to Ben M link to form here 05b.How to Process Returned Stock - Credit-Note-Form_Ver1_Dev3.pdf
- Print off a copy of POD highlight what is to be returned and send to Ben McCreath
Stock Control BM Complete collection note 05d. Customer Collection manual note - Bradford v1.xlsx
Stock Control BM -approves return and requests contract delivery to raise a call off for the return this is so transport can see and plan for the return |
Contract Delivery raise a call off as a loose items see process steps 10.How to Create a Loose item v1.docx
Misc. item stating collection of call off 1234 include detail of doors/frames and Qty`s
Stock Control BM Hand 2 copies of collection note to transport one copy is for customer one to be returned with the goods
Transport arranges with customer a collection date
Driver collects return gets customer to sign paperwork
Goods In KH Goods arrive in Bradford checked upon arrival
Goods In KH Paperwork handed back to stock control
Stock control BM consult with Contract Delivery/ Production
if goods are to be reworked /back to stock
Management Approval required from BM GO JN MI to choose below option
|
Contract Delivery if applicable Issue customer with authorised credit note
Stock Control Scan and save the collection note to the supporting files in Rtis on the contract adding the below as a description
- Customer return call off 1234 original call off 5678
Customer Collection manual - Bradford
Planning
How to view and Understand Planning Management information v2.4
There are several features in this planning management view which can be customised and useful
- Columns can be dragged and dropped to a different location
- Columns can be removed by left clicking, holding and dropping above the column header
- An excel export is available by selecting the excel export tab
To view planning management from the Planning menu, select the Planning Management folder and branch
This opens the planning management view each column`s detail is explained below
- Call off Prod Batch – this is the call off number first 4 digits followed by the batch number – no batch number means the call off has not been committed and cannot be planned
- No Batches – states the No of batches for the call off
- Bal – is short for Balances if all items on the call off have not been despatched a tick appears in the box and is highted in yellow
- Customer – customers name
- Site – site name
- Call off Description – details of the call off i.e., plot No`s
- Planner Status – this is a custom column and the codes and colours ae unique to the site – speak to site planner for a list of what these mean
- Planning comments – this is a free text box and is used by the planner and other agreed departments speak to site planner for how this is used and any break down of codes used
- Cont.Man – this is short for Contract Manager; this is the initials of the contract manager who set up the contract
- Spec Status – this will state either.
complete – which means the customer has signed of the specification
None – means awaiting customer sign off, communicate with the contract manager to find how why this is not complete
- To Purchasing Deadline – this column will flag up any issues with purchasing, dates appear when stock has been ordered to fulfil the order and needs to arrive on a certain date to complete the order on time
- Admin Status - there are several statuses which are driven by processes completed at the call off level which reflect in here these are
Issued to purchasing – Contract manager has issued the call off to purchasing and the call off is committed
Processing – Contract manager is currently processing the call off and has NOT been committed
Direct Dly – Purchasing have marked this as a direct delivery which means the supplier will deliver direct to the customer
Issued to Factory – The printed paperwork has been issued to the factory ready to start production
Provisional – this is the default setting that all call off`s start at
Sent for approval – Contract manager has sent off to customer a copy of their specification for them to approve this has NOT been committed
- Doorset Start week – this date is the date when the work is planned for
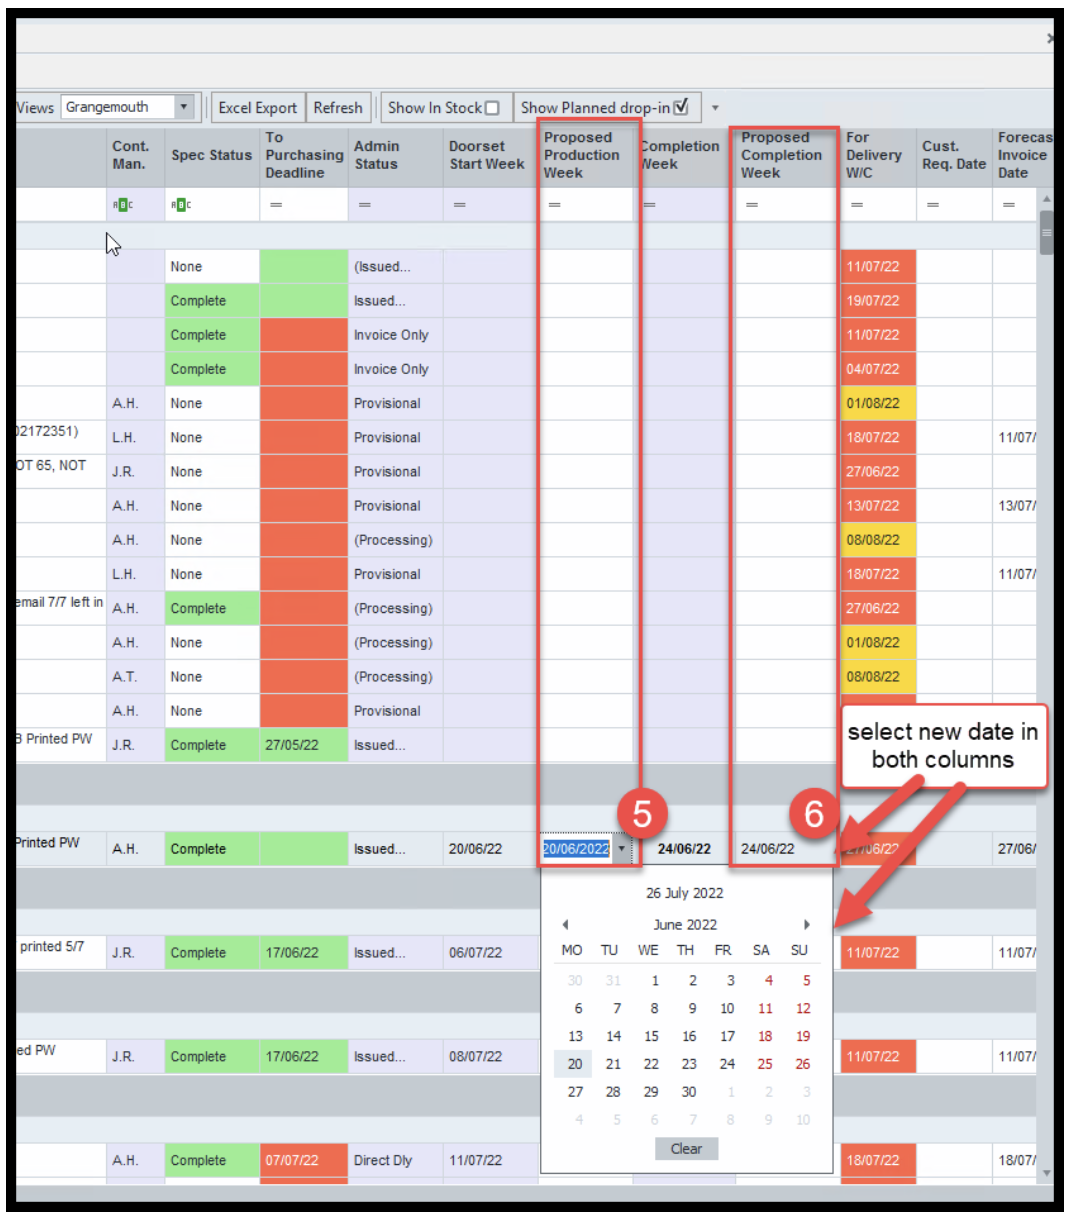
- Proposed production week – this should be blank unless the authorised planner changes this date
- Completion week – date here is the week the call off is to be completed
- Proposed completion week - this should be blank unless the authorised planner changes this date
- For Deliver WC – date here is the week commencing when the call off is to be delivered – for exact delivery date speak with planner/transport
- Scheduled Delivery - this should be blank unless the authorised planner changes this date
- Cust, Req, Date – date here is when the customer wants the goods delivering
- Forecast invoice date – this column must always have a date if there is no date the planner will need to rectify these otherwise goods cannot be despatched
- Forecast invoice month – details the month the customer will be invoice
- Prod. Status – choices here are all/part/none – this is driven by scanning if no scanning has been completed this will remain blank
- O/S Value – value of the call off
- PD – this column shows the QTY of doors to be manufactured
- PF - this column shows the QTY of frames to be manufactured
- PGO – Production Glass opening
- Screens - this column shows the QTY of screens to be manufactured
- Manual Qty – this is only to be used as a forecast tool, before it is scheduled, this will be updated by the scheduler
This view is set out by the site to show what is being manufactured on a particular day
a. Each day
b. No Call offs
c. Total value for the day
d. Qty of doors/frames/screens planned for manufacture
This view shows all call offs NOT planned; planner will communicate with contract manager/purchasing to resolve reasons why these are not ready to be planned
a. 01/01/01 - means not planned
b. Bal – These are balances still to follow
c. Planner Status – needs attention from planner/contract manager/purchasing
d. Comments – many needs addressing so planning can proceed
e. Spec status - many need addressing so planning can proceed
f. Many columns with no data - many need addressing so planning can proceed
g. Dates - means not planned
How to - Move a call off and replan
Below are the process steps and images of how to move a call off in planning management
In the proposed production week and proposed completion week columns select the date you wish to change to
How to use Batch Planning
Not currently used by the business contact rtissupport@nationaltimbergroup.com for an update on this
How to view doorset production tracking
This view displays exactly where in the production process a call off is
Doorset Production tracking – view progress through production
How to update forecast invoice date
- When despatching if the below message appears the forecast invoice date must be updated in planning prior to proceeding with the despatch
- Communicate with planning or follow the below steps to update the forecast date
No Despatches can be created without a Forecast invoice date
HOW TO - Print paperwork from desktop home screen
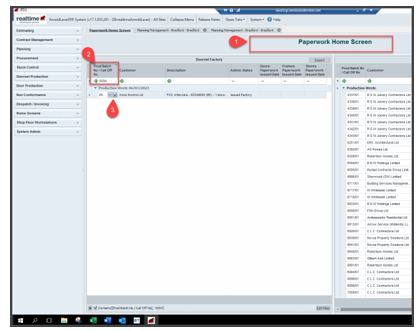
Your Rtis open screen desktop will be set to Paperwork home screen if you regular print paperwork if you need your home screen setting to this contact rtissupport@nationaltimbergroup.com
Choose from the pre-set dropdown what is to be printed this will be pre agreed when Rtis is set up, if unsure speak with your line manager
To print individual sheets, follow the below steps
New window opens ensure the issue button is selected
Procurement
How to create a PO for managed stock
In Rtis
Steps 1 – 23 how to raise and send a PO
Steps 24 to 32 how to amend a PO
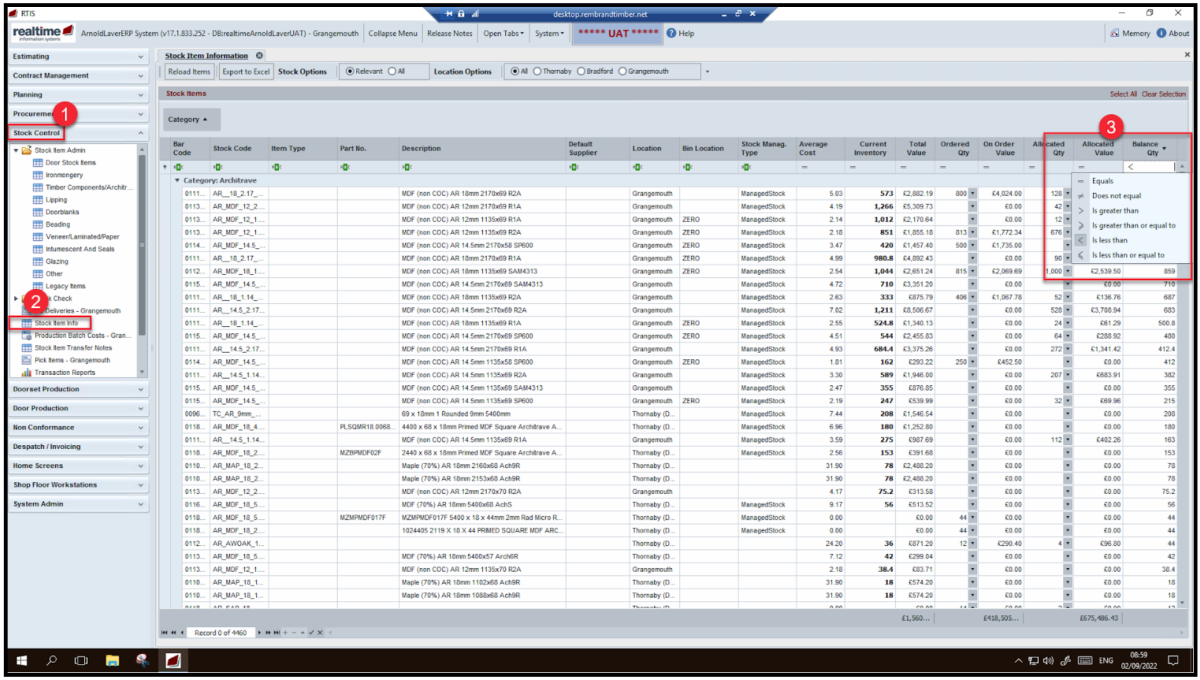
from the procurement menu select managed stock item console Grangemouth
New window opens select create new PO
PO category field select from drop down arrow - MDF
From stock category field dop down select - frame components
Search for and select supplier
Select the managed stock item tab
Select category (architrave)
Select the load tab
This then loads all the managed stock you can now select what you want to order
In the to process qty Colum enter the qty required
Select the process to open purchase order tab
Return to the PO by selecting the purchase order tab with generated PO number
Check the correct items have pulled through
Select update unit and pricing tab
Check and amend the unit
Check and amend prices ensure correct price is entered
Select sub date the date you raise the PO
To populate the required date field, select the PO Call off tab from the right-hand side
Date sent select from the drop down the day PO sent to supplier
Sent box tick this to confirm PO sent to supplier
Select the Print tab and select from the drop down external
This generates the PO as the email function in Rtis is currently not active save the PO in a folder (you may already have a folder you keep PO in if not please create one)
Open outlook and attach the saved PO and send to the supplier
How to amend/edit an open PO one that has not been booked in
From the procurement menu select purchase orders Grangemouth
Search for the PO you want to edit
Click on the PO line
Select the edit tab
PO now opens
Select the product line you wish to edit by clicking on the + icon on the left hand side of the line (see image below)
Once all amendments are made save and reprint ensure if you have already issued a PO that the amended PO is sent to the supplier
How to Raise a PO for non managed stock
In Rtis
Menu selected → Procurement → Topic from within Menu → Purchase Summary
Filter the Manu. Site to Grangemouth
Enter call off number in the call off search box
Working from left to right select each of the Timber fields and review requirements
Double click in each field
This opens new window
View this window if no stock to view in here tick the box in the top right-hand corner next to Not Req
Status auto populates to Not Required
Select save and exit
Window now closed and returns to purchase summary
When a field selected has stock requirements purchaser then reviews the stock and decides if this item is from stock or is to be purchased, if from stock select all from stock if to be purchased select not from stock
All timber will be ordered from the mill the selection here is not from stock
update the status to PO placed this is selected from the drop down
Comments can be added into the comments box which is a free text box
Save and exit making a note of the call off number
Window closes and returns to purchase summary
When a goods needs to be order select MRP console Grangemouth from procurement menu
This opens a new window
Select Timber from drop down next to material group
Select create new PO take note of the number
Select the category from the dropdown arrow i.e., hardwood
Select supplier from drop down this opens new window
Search for Thornbridge sawmill click on the …
Select the material requirements tab
Select pick call off tab
New window opens search for call off and select …
This pulls through the material requirements
View the requirements
If all are required select the set all Bal qty to order
Select process to PO tab
Click OK
Select the PO with the number you made note of in step 20
Select sub date this is the date PO created
In the delivery address/call off box select the call off tab enter the date the timber is required, this populated the req date filed
Tick the fax sent box this confirms PO /cutting list issued to the mill
Select the instructions/notes tab to add any comments required to communicate to the mill these will show on the PO only not the cutting list
Select the mill requirements tab
This opens new window select print frame cutting this then generates the cutting list
Select the printer icon select the correct printer and print
A pink and yellow copy of the cutting lists is also required using coloured paper already in stock print these copies ready to take to the mill
Select the print tab this generates the PO this can either be emailed to the mill or printed and taken across to the mill office when the cutting list goes over
Save and exit
When you return to the purchase summary and click in a different field your field will be updated with PO number and turn orange until the goods arrive and have been booked in
How to GRN and save delivery note
- How to GRN goods received steps 1 to 9
- How to scan and attach the delivery note to the Purchase order follow step 10
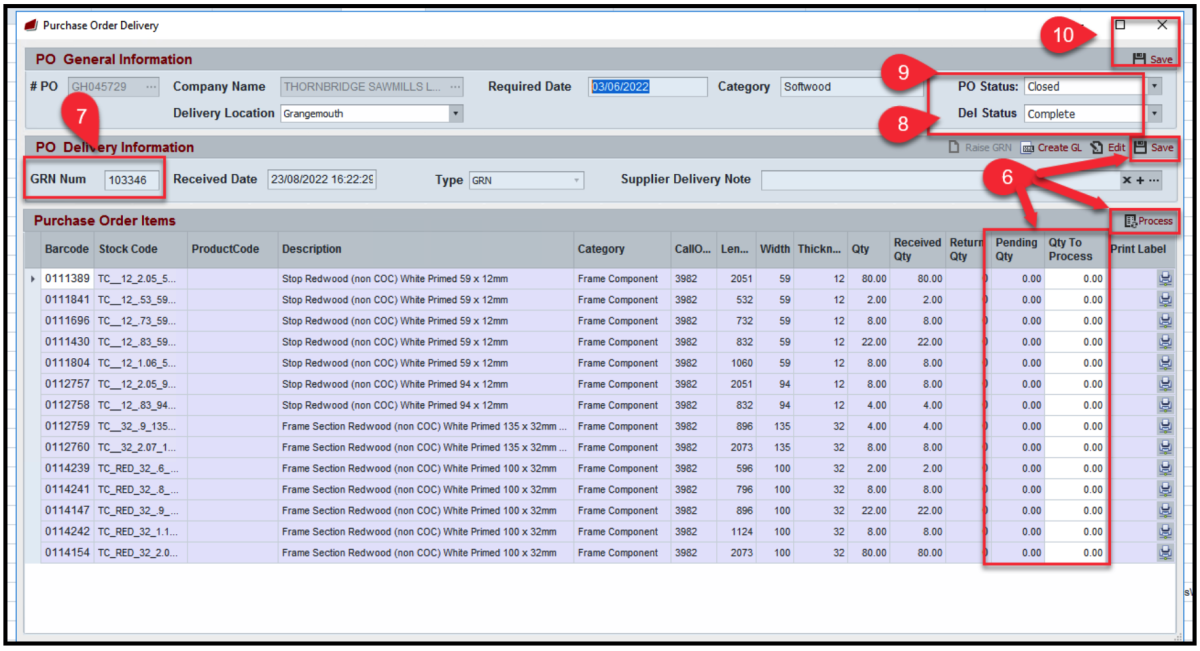
New window opens search in the PO Number field for the PO related to goods received and click on the word select
Pop up appears and asks if you want to create a new delivery for PO call off select Yes to continue
Select the correct status from the drop-down arrow in PO Status
- If all goods arrived select closed
- Choose different status to reflect correct situation with the goods
Select the correct status from the dop down arrow next to Del status
Select complete if this completes the PO
- Select other status that reflects the state of the goods if not complete
How to save and attach delivery note to PO
Scan deliveries note and save in the W Drive >Supplier Delivery Notes >Pending folder with the following naming convention
- PO Number _GRN Number example here GH045742_102394
Rtis runs a programme every 10 minutes and this will auto save the Delivery note to the purchase order
File the hard copy of the delivery note away
How to Set minimum Stock Quantity Level
How to set the minimum stock levels
How to view the set minimum levels
How to check Stock levels
How to view stock levels
How to View a PO and the Mill Cutting List- Grangemouth process only
In Rtis
Menu selected → Procurement → Topic from within Menu → Purchase Orders Grangemouth
Click on the PO line
Select the Edit tab
How to process a supplier return
Any questions about this process please contact purchasing@inteldoors.co.uk
Complete Supplier return form- follow this link for the form 04.Supplier Return Form.pdf
Ensure the following is complete.
- PO No
- Call off No
- Description
- Qty to be returned
- Add supporting photos
Email the completed form to purchasing@inteldoors.co.uk in the subject field of the email put SUPPLIER RETURN this will ensure the email is given priority
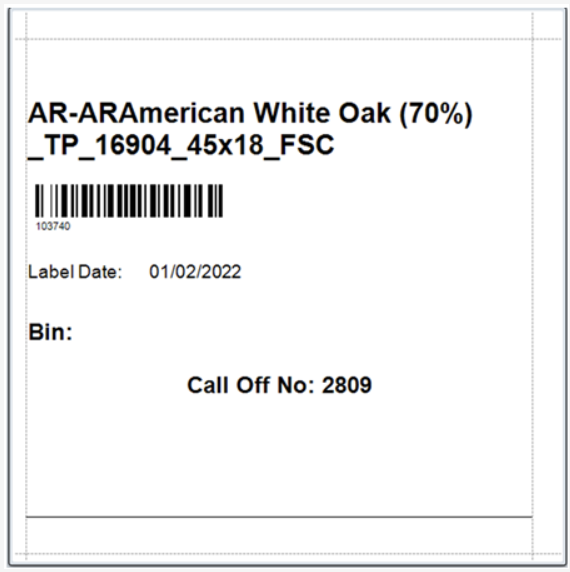
Once the supplier return has been generated by purchasing an acknowledgment will be emailed back with a label as per image1
Attach the label on the quarantined goods in the warehouse so everyone knows they are to be returned to the supplier and not to be used
How to Handle Purchase Ledger queries
- When purchase ledger has a query, the below list are areas in Realtime that are to be checked to support purchase ledger in resolving their query
- Below are what to check and cross reference, Investigate and amend any discrepancies, communicate with suppliers and purchase ledger
- If this does not solve the query log the query with rtissupport@nationaltimbergroup.com
View the supplier acknowledgement by selecting the … and check this match what is on the purchase order
Check GRN –
- from the stock control menu select PO Deliveries select you branch
- search by PO number to view GRN
How to use the purge button when materials doubling up
- Here is a temporary solution for when an error in Rtis arises where the material requirements are doubling up
- When the scheduler is creating a call off and saves, if the duplication of materials is an issue, an error message will appear stating there is a problem with material requirements duplicating
- The scheduler can then follow the below steps to correct this
Rtis are working on a permanent solution when this is resolved an update will be circulated
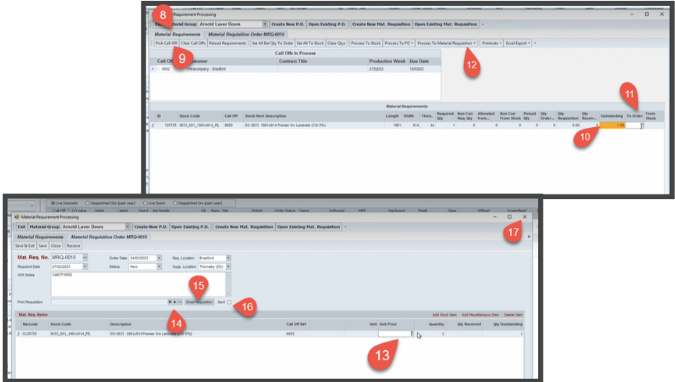
How to raise a material requisition stock transfer request
This part of the process is completed by purchasing
Raise a material requisition – requesting branch
How to and when to use Monday.com and inteldoors cost matrix - on Hold
How to create a stock code
- Stock codes are created by authorised purchasing teams
- Manufacturing codes and descriptions MUST be used when creating new codes, this creates a consistent naming convention to all codes created plus helps other colleagues who must identify stock from a description
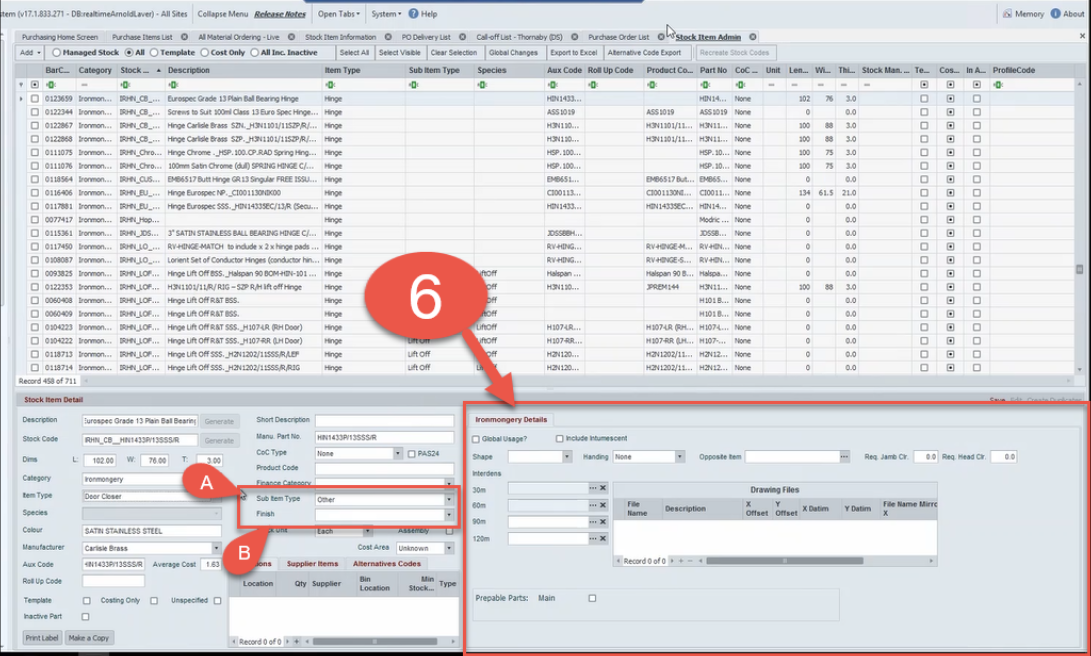
- Below is an example of a code created for Ironmongery the principle is the same for all codes created, however depending on the product different fields and information will need to be inputted, any query about unknown information or what to enter into a field in the first instance contact your designated superuser or log the request for help with rtissupport@nationaltimbergroup.com
This opens new window from the dropdown arrow of the Add tab select Add Ironmongery (this will selection is an example if you selected doorbanks when the drop down is selected it would say doorblanks)
Complete all fields as below in the stock item detail section in the lower half of the screen
Description – using the manufactures catalogue from the supplier
Manu Part No – enter supplier product code, copy this code
Aux code – paste code into this field
Category - ensure correct category is selected
Dims – enter part dimensions
Item type – select from drop down
Colour – enter from supplier description
Manufacture – select the supplier from the drop-down
Stock unit – select how these are sold from the drop down
Stock code –
select the generate button
pop up appears displaying the code select yes to proceed
select save
saving will lock and grey out the areas that have been completed
Select edit to continue
- Average Cost – find the cost from the price file, copy the Manu Part No and search in price file
- Save
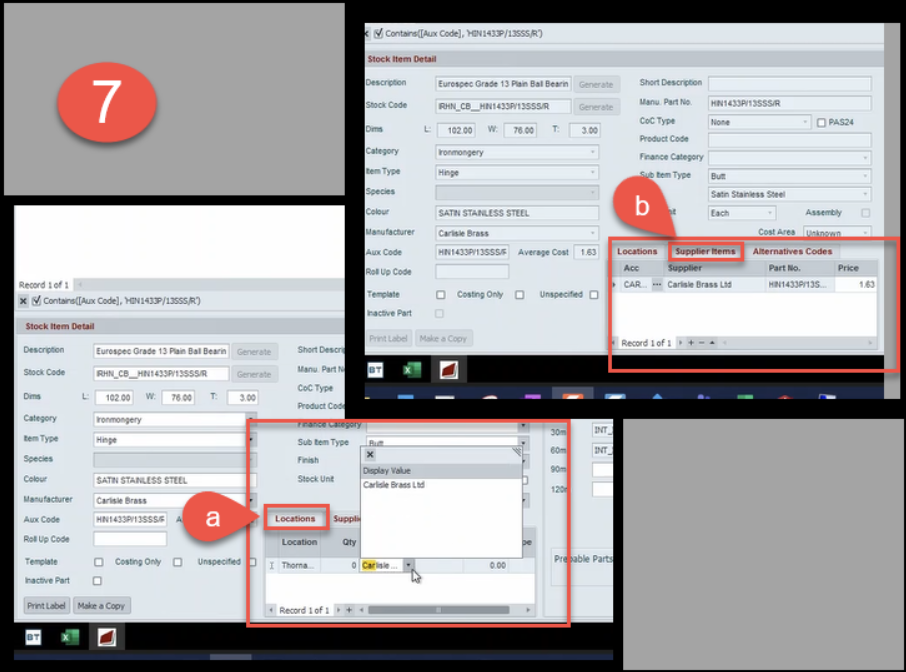
Complete all fields as below in the Ironmongery details section - depending on what is selected from the Item Type in step 4 different criteria needs to be completed – this section is crucial to what scheduling select and the instructions that are available and selected for the production team, all fields must be completed.
- Ensure that the sub item Type from the stock item section is correctly selected as these drives what is to be completed in this details section
- Finish – select from drop – down as per manufactures description and save
Here is a link to a short video showing an example of the importance of the detail in this section 06.How to create a stock code - Ironmongery Detail video.mp4
How to Create a stock code - Ironmongery Detail video
Here is a link to a short video showing an example of the importance of the detail in this section
How to add pallets
This process is a Bradford process completed by purchasing
How to raise a Purchase order for a serviced item
Stock Control
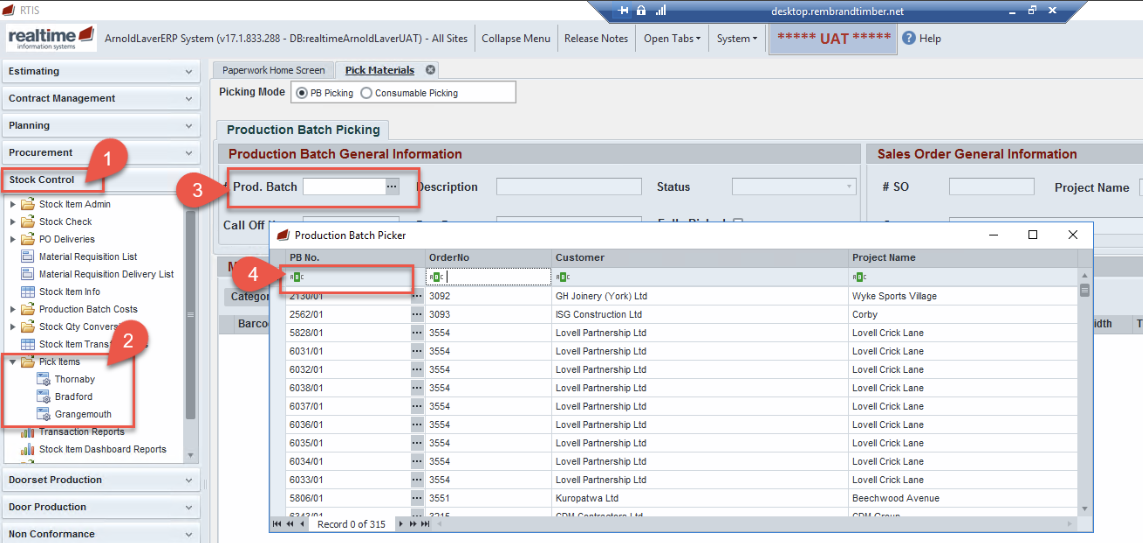
How To Confirm Goods Picked
- Bradford Pallets are added by purchasing in Bradford this will be shown on the picking screen no action is required by the person picking the stock
- Grangemouth pallets are added by completing steps 6-9
New window opens
GRangemouth Process only step 6-9
GM ONLY Grangemouth - search for pallets enter in bar code field 115362 or in the description fields search Grangemouth doorset pallet
Check screen against pick sheets when inputting Qtys input the actual Qtys picked and enter and then select process
Pop up window message “ the inventory for some items will be negative after the picking transaction, do you wish to continue” When this message appears select No and speak with your line manager about how you proceed
Check pending Qty moved to Qty picked and close
How to GRN (receipt of delivered goods)
- How to GRN goods received steps 1 to 9
- How to scan and attach the delivery note to the Purchase order follow step 10
New window opens search in the PO Number field for the PO related to goods received and click on the word select
Pop up appears and asks if you want to create a new delivery for PO call off select Yes to continue
Select the correct status from the drop-down arrow in PO Status
- If all goods arrived select closed
- Choose different status to reflect correct situation with the goods
Select the correct status from the drop down arrow next to Del status
Select complete if this completes the PO
- Select other status that reflects the state of the goods if not complete
How to save and attach delivery note to PO
Scan deliveries note and save in the W Drive >Supplier Delivery Notes >Pending folder with the following naming convention
- PO Number _GRN Number example here GH045742_102394
Rtis runs a programme every 10 minutes and this will auto save the Delivery note to the purchase order
File the hard copy of the delivery note away
Sample of processed Delivery note
How to check Stock levels
How to recieve a stock transfer
- Goods in check stock process Stock transfer like any other good in and hand transfer note to Stock control
- Stock control receive transfer and locate stock
Receive stock from Thornaby
How to process returned stock
- Before this process is completed in Rtis authorisation by branch Manager/Director must be obtained and this form must be completed 05b.How to Process Returned Stock - Credit-Note-Form_Ver1_Dev3.pdf
- Credit notes are NOT to be issued until the stock has been returned and inspected
- Having access to the original invoice is needed to complete this process
Stock returned needs to be reworked
Issue credit note - completed by authorised branch person link to training document 06.How To - Raise a Customer Credit against an Invoice.docx
Raise a new call off, this allows the goods to be re delivered. To be completed by authorised person
usually scheduler link here to training document 10.How to Create a Loose item v1.docx taking note of steps 3-6 below
In the description of the call off enter “re delivery of call off 1234” (this is the original call off number)
Add misc. item
Copy the description from the invoice for each item
Take the price from the invoice
Stock items Returned
Raise a credit for the customer – to completed by authorised branch person link to training document 06.How To - Raise a Customer Credit against an Invoice.docx
Complete stock adjustment to be completed by authorised person this is usually a purchasing process link here to the training document 06.How To - Complete a stock adjustment v1.docx |
Customer returns manual process - Bradford
This is the manual steps that are required to take place for a customer return. Departments involved are.
- Contract delivery
- Stock control
- purchasing
- Transport
- Goods in
- Management approvals
Customer request return
Contract Delivery –
- Complete credit note form and send to Ben M link to form here 05b.How to Process Returned Stock - Credit-Note-Form_Ver1_Dev3.pdf
- Print off a copy of POD highlight what is to be returned and send to Ben McCreath
Stock Control BM Complete collection note 05d. Customer Collection manual note - Bradford v1.xlsx
Stock Control BM -approves return and requests contract delivery to raise a call off for the return this is so transport can see and plan for the return
Contract Delivery raise a call off as a loose items see process steps 10.How to Create a Loose item v1.docx
Stock Control BM Hand 2 copies of collection note to transport one copy is for customer one to be returned with the goods
Transport arranges with customer a collection date
Driver collects return gets customer to sign paperwork
Goods In KH Goods arrive in Bradford checked upon arrival
Goods In KH Paperwork handed back to stock control
Stock control BM consult with Contract Delivery/ Production if goods are to be reworked /back to stock
Management Approval required from BM GO JN MI to choose below option
- Stock control to complete any stock adjustments for items being returned to stock
- Purchasing to raise new codes for items to be reworked
- Disposal of goods are damaged beyond use
Contract Delivery if applicable Issue customer with authorised credit note
Stock Control Scan and save the collection note to the supporting files in Rtis on the contract adding the below as a description
- Customer return call off 1234 original call off 5678
Customer Collection manual note
Complete a stock adjustment
Before any stock adjustment is to be processed in Rtis first an investigation must take place as to why the stock needs to be adjusted
- One way to investigate to ensure stock does need adjusting is to count the product group
- Also, it is best practice to review the stock item in the Stock Transaction Log items this is covered in steps 1 to 6 below
Stock adjustments must be authorised by site manager and can only be processed by person who have the authorisation to do this and the correct permissions in Rtis
Stock Transaction Log items
Select the Filter in the Trans Type column choices available here are in bold what you have permission to access examples such as:
- ettReceipt – GRN details
- Amendment – Adjustment made
Filter by each type to see what movements have happened with the stock this will build a picture of the stock’s movements
Complete Stock Adjustment
Add notes – add reason for the adjustment include as much information as possible add your initials so we know who has made the adjustment
This is then manually recorded in the daily stock report which is in MS Teams
Complete a Perpetual stock check and a Full Stock Check
- Picking and GRN`s can NOT be processed in the system when a stock count is happening
- Despatching can take place if picking has been completed
Scenario 1 – Count is completed first thing before any picking or GRN`s take place, in this scenario the count is to be processed and date the count as today (same day)
Scenario 2 – Picking and GRN`s can take place up to the point the count is to start (NO more picking or GRN`s can be processed once the count has started) the count is processed and date the count with tomorrows date (the following day)
Remove the qty and values
Print sheet and hand out for counting
Sheets returned may need further investigation before proceeding with Manager/Director approval for large Qty/Value variances
How to search for stock and check its bin location
How to locate stock to a bin location
How to create a call off for Bradford Mill Ancillary items
This process is completed by stock control department upon receiving a PO from Bradford mill. this process is only used for Ancillary items for all other items please contact purchasing@inteldoors.co.uk for advise
Transport
Here is an overview of how to use Transport Management
Transport Management overview
The left-hand side of the screen has all call offs, the columns contents explained below; these columns can be filtered
Call off – call off number
Customer – Customer name
Due – this is the due date customer has requested for deliver the due date is always week commencing
Pref Day – when a customer requests a preferred delivery date the scheduler will enter this when the call off is first created and will be visible here
No Doors- this will show the quantity of doors on the order
No Frames – this will show the number of frames on the order
CO Value OS – this is the value of the call off
Postcode – Postcode of where the call off is to be delivered – if this column does not have this information this needs reporting back to the scheduling team
County – county of where to be delivered
Transport – when the call off has been assigned to a vehicle the vehicle details will be visible
Site – this is to be filtered to your site to view all your call offs
Colour coding explanations below Grey – the call off has been despatched in Rtis Orange/Brown – this is a IBT from Thornaby Blue – this is a new call off not planned yet for delivery Yellow – this means that contract delivery has contacted the customer and the customer is ready to take delivery as per the week commencing date and knows that transport will contact them soon to confirm which day of that week the delivery will be made Purple – Transport has assigned a vehicle to the call off Green – Transport has confirmed with the customer that the call off will be delivered on the date planned |
How to create a manifest
Click on apply this will show on all scheduled call offs for the selected vehicle*** please note a manifest can only be created once the call off has been despatched and is grey in the transport screen
New window appears enter reference and driver details select continue |
In call off number order, the full call off is listed
How to create a loading sheet
Select the despatch/Invoicing menu, Open the call offs despatch management folder and select your branch
Select despatch manager tab new window opens (If this tab is not active this is due to the call off being on hold with credit control) |
Select O/S all
tab this activates in red what is to be attached to the despatch select these tabs
Driver POD - Bradford only
Intel Bradford - Interim POD Option for Delivery POD’s
Delivery Process:
- Driver- Take up to 5 photos of the delivery being unloaded on site using the camera option
- Customer - Sign driver copy of the POD
- Driver - Take photo of the POD (signature page, last page only, including Despatch Number)
- Driver – Select delivery photos and a photo of the signed POD
- Driver – Create an email using the Outlook App
- Enter email address: delivery.pod@inteldoors.co.uk
- Enter Subject: Call off number/Despatch (As per the POD)
- Driver – Send email
To Note:
The driver should create and send the email at the time of delivery, this will ensure the correct time and date of delivery is contained within the email.
Office Admin Process:
- Delivery email arrives in the inbox
- Admin Option 1
- Admin - Attach the email to the order in RTIS
- Admin Option 2
- Admin – Rename the email to a specific format (Calloff_Despatch)
- Admin – Move the email to a specific folder
- RTIS – Automatically uploads the email to the order in RTIS
Example email received:
Driver Delivery Process: (Step by step)
- Deliver order as per the current procedure – Up to 5 photos using camera, 1 photo of the signed POD
Logging in using MFA: (Step by step)
Follow the process below when the Multi Factor Authentications requests, requires username and password
Follow steps a-d on handheld device
Non Conformance
Non conformance help sheet
Non-conformance's are part of our Quality Management System ISO9001 and we as a company need to be aware of problems, we must document, determine, identify, and verify root causes and corrective actions—Identify all applicable causes that could explain why the problem occurred. All causes shall be verified or proved, not determined by fuzzy brainstorming. We can use 5 Whys and cause and effect diagrams to map causes against the effect or problem identified. Implement the corrective action and finally action the preventative action to prevent recurrence of a problem, By analysing and evaluating Non-conformances we can monitor and hopefully see improvements, which helps everyone in time and money and keeps customers happy.
Select the download button to download and view the helpsheet
How to Raise and complete a Nonconformance
Non-conformace’s are part of our Quality Management System ISO9001 and we as a company need to be aware of problems, we must document, determine, identify, and verify root causes and corrective actions—Identify all applicable causes that could explain why the problem occurred. All causes shall be verified or proved.
We can use 5 Whys and cause and effect diagrams to map causes against the effect or problem identified. Implement the corrective action and finally action the preventative action to prevent recurrence of a problem, By analysing and evaluating Non-conformances we can monitor and hopefully see impovements, which helps everyone in time and money and keeps customers happy.
Implement the corrective action and finally action the preventative action to prevent recurrence of a problem, By analysing and evaluating Non-conformances we can monitor and hopefully see impovements, which helps everyone in time and money and keeps customers happy.
Select add Non-conformance
(There is an option here to select add complaint this is not currently used by the business)
N/C Basic Info section
New window opens this is the non-conformance screen each field is to be completed
N/C Number – this will generate when the document is completed and saved
Raised by – select from the drop-down box the person who identified the nonconformance
Select Fault origin – if unsure select the T.B.C
Supervisors select the supervisor of the person who has raised the nonconformance
Where identified – select from the drop-down arrow where this was identified
Raised Date- select the date this NC was raised
Call Off No - Select the … next to the call off No field this will open a new search window Search for and select the call off related to this nonconformance this will pull through the call off number and the customers details
Issue Field – select from he drops down what the issue is
Fault Process – select from the drop down what the fault process is
PO No/ Supplier - this is for purchasing use ONLY
Details – this is a free text box type in here details of what has happened
Action Type – select what action is required, if unsure select TBC
Rew.Proc – not currently used
Replace Mats – this field will automatically be ticked if rework or remake is previously selected
Images
Add image here images can be added by selecting the + this will open the folders on the PC where images have previously been saved, select the image to be added
Title filed – will be populated by the name of the image uploaded
File name – this will also be auto populated
Notes - free text box for notes
Materials reordering section
If new materials are required select the box Materials required, purchasing will complete the rest of this section
Save and exit the NR number will now be generated
Details/Responses section to be completed by the supervisor
Department - select from the drop down
Operator – select from the drop down
Cont Man Acks - tick will appear in this box when the contract manager/scheduler for this Contract acknowledges the non-con on their home screen and communicates with the customer that we may have a problem and the delivery could be delayed. (This will stay on the home screen until the non con is finalised and signed off by the Quality Manager.
Supervisor Inspection Req’d
This will be ticked by purchasing if the material is on a longer delivery and the planner will replan and contact manager/scheduler to let the customer know.
Date – select date of the supervisor’s inspection
Replan – to be ticked if this requires replanning
Ack`d – to be acknowledged by planner that re planning has taken place
Findings
Determine, identify, and verify root causes —Identify all applicable causes that could explain why the problem occurred. Also identify why the problem was not noticed at the time it occurred. All causes shall be verified or proved, not determined by fuzzy brainstorming. One can use 5 Whys and cause and effect diagrams to map causes against the effect or problem identified.
Costs section
Material Cost - Purchasing department to complete.
Reject Cost -Purchasing department to complete.
Admin Mins - The amount of time to investigate this problem.
Factory Mins - The amount of time to remake or repair the problem.
Preventative Actions
Prevention Code - Select from dropdown box, please bear in mind that we need to provide evidence of the corrective action, for example if training this needs to be documented and available for inspection if requested.
Description free text box to be completed Define and implement the best corrective actions. Take preventive measures—Modify the management systems, operation systems, practices, and procedures to prevent recurrence of this and all similar problems. Action taken to avoid re-occurrence (Root cause to be analysed and evaluated)
Finalised By – Select from the drop down the person that is happy with the findings/root cause and preventative actions to stop the problem happening again.
Quality Manager sign off
Quality Manager Reviewed - Review will be ticked and dated once this document is completed, by the quality manager. If findings and preventative actions are not deemed as true. Any queries will be discussed with the team and management
Non conformance - Damaged manual sheet - completed by operator on shop floor
Example of manual sheet used on the shopfloor - your site may have a different sheet provided this is approved by your stock control team or manager then continue to use the one already in use
Despatch
How to Despatch when items missing and are to follow - Grangemouth
After creating the despatch
Select the select O/S tab
In the view below deselect the doors /items to follow be removing the tick in the doors or frame columns
Select in red the tabs that say assign xx sets 2 frames to Dxxx
Also select if there are loose items to process these too will be in RED assign xxx to D xxxx
Check the items that are to follow are NOT highlighted in green
Select the green exit button with the tick, this will return you to the shipping screen
Select the despatch tab to continue with the shipping
Select add shipment
Select the haulier
Add in the pallet qty field the number of pallets used
In the notes field enter qty of items to follow
Select the + add to shipment
Ensure and check that everything from the 2 ship columns turn green except anything to follow
Select the + next to the create shipment
This creates the despatch note select the print shipment note tab
View despatch note
Check the despatch not to ensure the to follow items and the summary info is correct
Print the despatch note make a pink copy adding pallet sheet and take to transport
How to Despatch
Follow the below steps to Despatch a call off
Select the drop-down arrow from the edit tab Select Call off despatches - this opens a new window
Select Despatch manager tab - this opens a new window - If despatch manager is greyed out this will be because the customer’s account is on credit hold - please speak to the sales support team member/Contract Delivery/Scheduler and ask have they requested credit control to release for delivery.
Contact Contract delivery or credit control to release the order
Select Add shipment
- Enter delivery date
- Select haulier by searching in the drop-down arrow
- Select Vehicle this despatch will be loaded on to
- If mill transport delivering search and select – mill, select this
- If customer collecting search and select - for collection
- If site is delivering via a member of staff - search and select the member of staff name
If the goods are to be delivered direct by the supplier write in the notes box DELIVERED BY SUPPLIER
Select + add remaining to shipment – here you will see the line go green that are added to the shipment |
Select the print shipment note tab – shipment PDF is now generated and opens,Check this ensuring all goods are clearly despatched
Select the printer icon
- Print 2 copies – one copy to be left with the customer
- Second copy is POD write this top right – this is signed by customer and returned this is our POD
Goods delivered direct by supplier do NOT need printing
Check the last page of the despatch note for any special instructions
and act upon these, this maybe calling the customer/checking
Both copies of despatch notes are given to the driver - one to be left with the customer
|
How to update forecast invoice date
- When despatching if the below message appears the forecast invoice date must be updated in planning prior to proceeding with the despatch
- Communicate with planning or follow the below steps to update the forecast date
“No Despatches can be created without a Forecast invoice date”
How to Despatch when goods to follow - Bradford only
- In Bradford a loading sheet is created before despatch takes place
- Once a loading sheet has been created, marking goods as to follow requires the goods to be first be taken off the despatch and start the process again
How to remove the Goods off the despatch
Search for call off click on line and select edit ( not using the drop down arrow )
Select despatch manager this opens despatch assigner
From within the Doorsets on despatch D1234 – lower half of the screen from the select tab drop down arrow select doors and frames this activates in red the un-assign tab select this, repeat the same for the loose items this takes the items all off the despatch
Now proceed with the despatching with goods to follow
Select the select O/S tab
In the view below deselect the doors /items to follow be removing the tick in the doors or frame columns
Check that the doors/stock has reduced by the number to follow as shown in screen
Select in red the tabs that say assign xx sets 2 frames to Dxxx
Also select if there are loose items to process these too will be in RED assign xxx to D xxxx
Check the items that are to follow are NOT highlighted in green
Select the green exit button with the tick, this will return you to the shipping screen
select the undespatched items tab to view the items to follow
Select the despatch tab to continue with the shipping
Select add shipment
Select the date the goods will be delivered
Select the haulier
Add in the pallet qty field the number of pallets used
In the notes field enter qty of items to follow
Select the + add to shipment
Ensure and check that everything from the 2 ship columns turn green except anything to follow
Select the +next to the create shipment
This creates the despatch note select the print shipment note tab
View despatch note
Check the despatch note to ensure the to follow items and the summary info is correct
Print two copies of the despatch note as normal copy for customer copy to be signed by customer and returned as POD
Invoicing
How to Save a POD and Invoice
Check POD status
Before invoicing calculate costs steps 10-14
How to save POD to the Despatch note follow steps 1 to 9
How to - Invoice once POD received - follow steps 10 to 31
how to complete any Invoicing required through Bistrack TT add
How and where to save a POD
Collect POD daily from Transport
Check POD is signed and there are no comments or crossings out – any comments need investigating immediately
Scan POD and save in the W Drive >Customer POD >Pending folder with the following naming convention
Call off Number _Despatch notes number example here 3583_D7827
How to attach POD to despatch Note
From the despatch/invoicing menu select despatch list Grangemouth
Search for call off click on the call off line and select Edit
Despatch note opens in the POD field select the +
This takes you to your folders go to the W drive> customer POD> pending and select the already saved POD
This attaches in the POD field click on the … to ensure the correct copy is attached
Save and save and exit
How to invoice a customer one the above steps have been followed
Before invoicing can take place, we must ensure that costs have been calculated and added to invoices continue with the following steps to completed this
From contract management menu select call off list search and open the call off
Select call off tab
New window opens - Ensure the correct call off is selected from the left-hand side of call offs
Far right in the call off red area select the call off costs tab this tab has lines around it whilst it is updating as soon as these disappear save and exit
From the despatch and invoicing menu select invoicing list Grangemouth
Select the drop-down arrow next to add select add despatch invoice
Search window opens search in the shipment No field using despatch number
Select the … to open new window
Select INV; NEW tab this activates screen ready to invoice
In the invoice details area red right hand side select the … next to the invoice field
This generated the invoice number write this on the despatch note
Select invoice date from drop down arrow
Select post invoice tab
Select Export to NAV
Select send email new window opens with invoice attached to email select send this sends email direct to customer
Select the Recalc Costs tab costs should now show in the costs field if not follow the below steps
Save and exit go back into the invoice to check the costs have now pulled through by following the below steps
Search for call off click on call off line and select the edit tab
Invoice opens check the costs have now pulled through
If costs have not pulled through this needs to be logged in the MS Teams Rtis support group providing full details of call off and where possible a screen shot
Save and exit
In the to invoice comments column enter date emailed to customer
File POD away in call off number order
How to View a POD and Invoice
By following the steps below, you can view a POD and Invoice also attached here is a link to a short video showing the process: https://www.youtube.com/watch?v=AvNaFulJu-k
To view a POD
To View the Invoice
How to complete invoicing in Bistrack - Grangemouth process only
- This process is to be followed for all contracts/call offs that have purchase orders sent to Thornbridge
- This process involves working in both Rtis and Bistrack ideally on separate screens throughout these instructions Bistrack will be referred to as BT
Identify first the Invoices that need the BT process
- In Rtis - Select from the despatch/invoicing menu Invoicing list Grangemouth
- Locate the BisTrack column and filter to show all the empty fields any greyed out fields DO NOT need this process doing
Remove columns so that you can clearly see the below side by side
- Invoice No
- Invoice date
- Customer
- Title
- BisTrack Ref
- Customer order No
In BT select new order tab (top left of menu)
Have open in Rtis the call off that you are completing this process for
from the drop-down arrow select new order
Search for customer in the customer field, either by name or by account numbers supplied separately
In the sales type field select direct
Select invoice date this is the date invoiced in Rtis
In the customer ref field copy and paste from Rtis the customer order No (This is the customers PO number)
In the deliver to field select from the drop down the correct site address
If the address you require is not here, first double check that you have selected the correct customer as some have different names i.e., homes/ Ltd/partnership.
If the delivery address is still not there this can be added by selecting the bland sheet of paper icon next to the delivery address
Remove any Plot number details that are in the address
Select F6 Lines tab
Click on the other options tab (bottom right)
Select Add special line
Select create the create it from following product and enter in the field 0DC4J (this is a zero not the letter O)
Select enter new window opens select correct code 0DC4J
Select F12
New window opens – return to Rtis in the call off already open copy the description and paste into the description field in BT
In BT enter the value of the call off in the standard sell and buy price fields
Select F12 and Finish
Select Finish
This opens a new window in the QTY field enter 1
Click OK
New window opens select Yes
Select the more fields tab
This opens a new window enter or copy and paste from Rtis the Plot details in the plot No field
Select F6
Select other options
Select insert text line
New window opens in this box write (Invoice Number RT………. ) Exactly
Select OK
Select the green complete tab
Message may appear the date required is in the past do you wish to continue select Yes
New window opens select F12 and next
In the supplier field click on the …
New window opens search for TSLAV001
Select go
Select OK
Select continue
Select Finish **** here in the screen are the BT order and PO numbers take note of these as these are needed for Rtis and to communicate with purchase ledger
Select OK
Select NO
Select on the top search bar drop down purchase orders for approval click on the go – this step can be completed once all items completed
Orders over £5K will need to be approved by …
Double click on the line and approve this will then disappear from the list
Final step is to email Susan Balloch if out of office on email Tom smith with the following information.
- Subject title of email – Grangemouth BT invoicing detail
- Body of email – please can you match and approve PO XXXXXXXX RTIS invoice number RTxxxxxxxxx
Go back to Rtis and in the call off select the call offs tab
In the BisTrack ref field enter the BT order number noted in step 37 – Save and Exit
Return to Rtis and the Invoicing list select refresh this auto populates the BisTrack field with the order number
Any call offs in Rtis with a nil value please follow the below step.
Open call off and select call off tab in the BisTrack ref field enter N/A
How to raise a customer credit against an invoice - Grangemouth Process only
Customer credits must first be authorised by site manager and relevant paperwork completed before being processed by authorised user
Bradford process is in the contract delivery menu section
Search for the invoice the credit is to be raised against and select the row by clicking in the line
Select the + to add a manual credit – here add a description and reason for the credit also include the invoice number
This shows manual entry
The credit note is available here select the three little dots… to view and check the credit note
Troubleshooting - Invoicing
When trouble shooting being able to invoice there are a few things to check before seeking further help.
- In order to invoice a customer a call off must be committed and despatchedCheck call off is committed
- Check call off is Picked and Despatched
Can't Invoice
First place to check is too open call off list standard view
Select the call off and see if it has been committed if yes proceed to check if despatched if no go to step 3
Identify who created the call off and ask the sales support person to commit the call off
To check if a call off has been despatched open call off list status view and search for call off
Check if the Call off has been despatched this will show in the column named despatched
If no then check if the items have been picked and despatch the call off
If yes seek further help by emailing rtissupport@nationaltimbergroup.com
Despatch/Invoicing management
From Despatch/Invoicing Menu select Despatch list select your branch
Ensure all Invoiced despatches have a tick in the column (this should be completed at the time of invoicing)
Shopfloor Workstations
Drop in - Palletisation
Check that the computer is switched on at both the mains and the computer terminal. Check that the monitor is switched on and any associated printer is connected.
Sign in to the computer if required with the passwords that are assigned to that work station.
Once you have clicked on the icon, the below pop up may appear.
- If it does click ok and remember me
When the login screen appears enter the password for that work station.
- For example if in Grangemouth use the below. Bradford and Thornaby will have different login details
Credential screen appears
Enter password
Select remember me
Select ok
The main screen for the shop floor applications now loads this can take a few seconds
It will now go back to the original page
Select apply (F4)
New window opens
When you select create pallet the icon below appears in the box on the right hand side. This now means that you have a pallet that we can load items onto.
Scan the barcodes on the A3 schedule. There is 2 barcodes one represents the frame while the other is for the door. Each product line on the A3 schedule has a unique barcode.
Once you scan item you want to load onto a pallet from the A3 it moves across from the left hand side of he screen and onto the pallet you have just opened.
Labels are then automatically printed – these are to be attached to the head of the frame and the top of the door.
Once all is scanned or you have completed everything that is going to the pallet select Pallet status (F3)
Key notes
- When using the shop floor application of RTIS you use the following keys on the keyboard.
F1 is any box like above that is red
F2 is any box like above that is blue
F3 is any box like above that is green
F4 is any box like above that is yellow - If an item is scanned onto a pallet that is incorrect simply re scan the item and it will let you remove it from the pallet.
CNC Shopfloor machines
Shopfloor Glazing
Shopfloor Frames
Doorset production tracking
Door production tracking
System
How to Set up a new User in Rtis - IT only
The below process can only be completed by IT or an authorised Superuser access to this process can be requested by emailing rtissupport@nationaltimbergroup.com
Add a new user
Repeat step 1- when new window opens select Employee admin then proceed with the below seps
Once in the employee Admin screen select the + this activates the lower section of the screen ready to be completed
Set User Permissions
How to remove a User Locks
Rtis does not allow two users at a time to be able to work on any process to protect this if a second user accesses a contract/call off that a user has open , Rtis will allow the second user to view the process off however no changes can be made and a pop up will appear saying “ locked by person`s name” if access is required the user can directly ask the user who is in the process to close what they are doing to give them access.
There are occasions that a user may forget to close a screen, and this locks it not allowing anyone else to work on this, the user may not available/on holiday to close this down correctly, under these circumstances the user lock will need to be removed by an authorised person. The below process will remove the user lock
This process is only available to authorised persons, usually a site superuser or manager, if you need access to this process log a request at rtissupport@nationaltimbergroup.com with your line manager copied into the request
- For urgent user locks to be removed call the IT help desk on 0114 276 4855
From the main Rtis screen locate the System tab and select the drop-down arrow – great care must be taken to any actions completed within this tab
New window opens this shows all users that are locked into a screen – before proceeding to step 4, ensure the user you are about to remove is not currently needing access to this process as the next steps will immediately kick this user out of the process
Reports
How To Approve a Purchase Order
Managers who have permission to authorise purchase orders will need to follow the below process
Approve by ticking the authorised box if this box is not active you do not have the correct permissions contact rtissupport@nationaltimbergroup.com
How to view and understand BI Reports
There are many BI (Business Information) reports in Rtis. Each menu section within Rtis has a report section, below are two examples
Contract Management this is used to view the order book, showing what is still outstanding on the customers purchase order NOT called off
Despatch & Invoicing Reports Gives useful information helps managers see at a high-level area`s that need further investigation within despatch and invoicing, a few examples are.
Why has this not been invoiced
Why are there no individual costs to view?
Why is this showing as 100% margin
Should you require information about other BI reports please log a request with rtissupport@nationaltimbergroup.com
Contract Management
Call off Value and value not on call off
shows a true value of sales processed and what is still to be processed
Despatch and invoicing reports
Select site, from the manufacturing site tab and select OK this reduces the view to the site selected
This report style has many features.
- By double clicking into cells a new window opens giving details of the call off, the example here shows a despatched but not yet invoiced call off
- Maximise the view of a and this reveals more data to view such as.
- Total cost
- Profit
- Margin
- Costs broken down
- Cost adjustments
No of doors/frames/GO`s
Another feature is to be able to drag and drop tabs into the report, example here.
- Taken the purchasing status from section a
- And dropped in section b
- This information can now be viewed in c
How to view and use the purchase order report
This report give a high level view for managers of what is on order and the value spent with suppliers.
From the drop down arrow of the select report section and select general and select a date range
Select load data
This view shows individual supplier stock values
A. Double clicking in cells example a opens the detail of the purchase orders
B. This is the detail of what is on order with this supplier


